Tips for Optimizing Photoshop Performance on Your Computer
Have you ever wondered if you were getting the best performance out of Adobe’s Photoshop Creative Cloud? Depending on your particular workflow and individual needs, your favorite image editing software can be tweaked and adjusted for optimal performance. Today, we are taking a look at some of the settings available in Photoshop to get you running more efficiently on your personal computer.
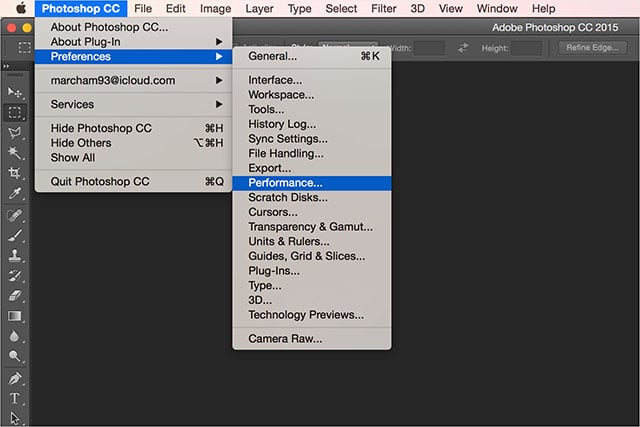
The screen displayed allows us to adjust a number of settings including how Photoshop manages our system’s memory and utilizes our graphics card. On another screen, we can also modify how the software works with our current storage drive. We will be taking a look at all of the available settings to ensure Photoshop is running at peak performance on your machine.
Memory Usage (RAM)
The memory setting notes how much RAM is currently available on your PC and how much we permit Photoshop to use. It is important to note that the software takes into consideration how much memory is simply needed to run your PC, and that amount has been subtracted from the displayed ‘Available RAM’.
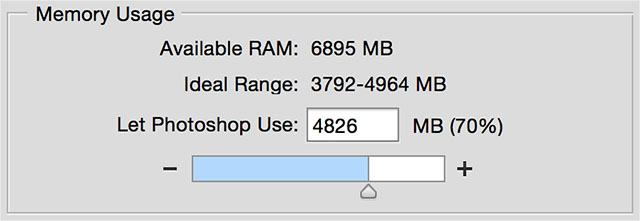
By default, Photoshop utilizes 70% of your available memory and leaves 30% to other non-system processes. If you tend to multitask while using Photoshop, such as listening to music and surfing the web, you will most likely want to leave the memory setting at around 70%. However, if you tend to use Photoshop without other background tasks, then you may want to consider increasing the amount of memory permitted.
One way to determine whether Photoshop needs more memory from your system is to check the built-in efficiency meter. With an image open in Photoshop, go to the lower left-hand corner and click the small ‘arrow’ located in the status bar and select ‘Efficiency’. If your level of effectiveness falls below 95% then Photoshop needs more memory allocated to help it operate smoothly.
Recommendation: Allocate as much memory to Photoshop as possible for increased performance. However, keep in mind how much memory you will need for other background applications running.
Cache Levels and Tile Sizes
Photoshop utilizes caches (collections of data) to help the software run more efficiently on your PC’s particular hardware. There are two aspects to these caches, levels and tile sizes, and they can be adjusted depending on the type of work you typically carry out.
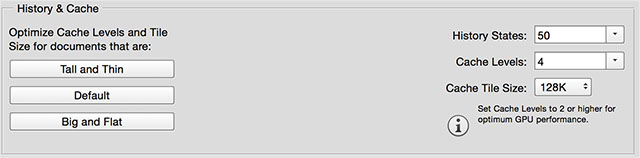
Higher cache levels will allow Photoshop to run faster during its operation, but will also increase the software’s initial startup time. Cache levels can be adjusted between one and eight. By default, Photoshop has selected a cache level of four. If you work with large documents and few layers, the recommendation is to set a higher cache level such as six. Otherwise, someone who utilizes smaller documents with many layers at a time may want to consider a cache level of around two.
Working alongside cache levels are the tile sizes, which dictate the total amount of data that operates at a single time. A larger tile will allow you to speed up complex operations such as dodging and burning, but will slow down less complex operations such as brush strokes. Bigger tiles are recommended for large images while smaller tiles are recommended for small lower resolution images. Keep in mind Photoshop considers ‘large images’ to be 100 MB or more.
Luckily, instead of needing to juggle the cache levels and tile sizes, Photoshop allows you to pick between three presets which they call ‘Default’, ‘Tall and Thin’, and ‘Big and Flat’. The ‘Tall and Thin’ option is recommended for small documents or have many layers. If you work with larger documents and fewer layers than ‘Big and Flat’ is recommended. Most people will find ‘Default’ to be the perfect happy medium.
Recommendation: Use the ‘Default’ setting unless you have a particular use case such as colossal documents or an extensive number of layers.
History States
While we are here, we can also adjust the number of ‘History States’ that Photoshop will store. The more history states you select, the more disk space and memory the application will utilize, which can slow down overall performance. However, more history states mean that you can hit that Undo button a few more times – all the way up to 1,000. We recommend leaving the default of 20 and then adjusting as needed if you find you want the ability to jump back further in your history.
Recommendation: For best performance, leave the history at its default state of ’20’ unless you find yourself needing to undo larger amounts of data at a time.
Graphics Processor Settings
There are quite a few options available when we click the ‘Advanced Settings’ button for our graphics processor (GPU). First is the drawing mode that dictates the number of features Photoshop takes advantage of based on your computer’s hardware. There are three drawing modes including Basic, Normal, and Advanced. In terms of performance, we generally want to set this setting as high as possible – to the Advanced position.
If you find yourself with other applications in the background that require GPU power, this setting may not be the most effective though, as it can be resource intensive. In addition, some older graphic cards may develop issues; if this happens, simply decrease the mode by one notch and restart Photoshop to see if it solves the problem.
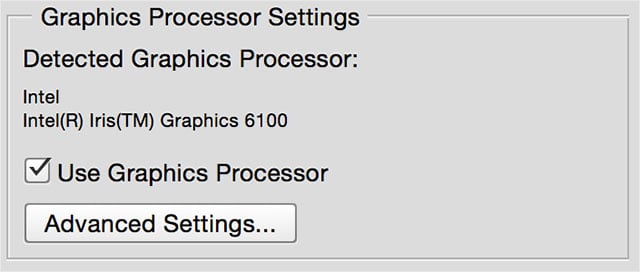
You can also choose to enable OpenCL, anti-alias guide/paths, and usage of the GPU for accelerating computation. If you find a bit too much stress being put on your CPU, we recommend enabling the ‘Accelerate Computation’ setting to give it some relief. If you find your GPU struggling, you can disable the anti-alias feature for improved performance, but decreased smoothing of drawn guides and paths.
The OpenCL setting can also greatly accelerate Photoshop’s performance, but the framework is only available on newer GPUs. Try enabling this setting if possible as it will speed up actions such as applying blur filters.
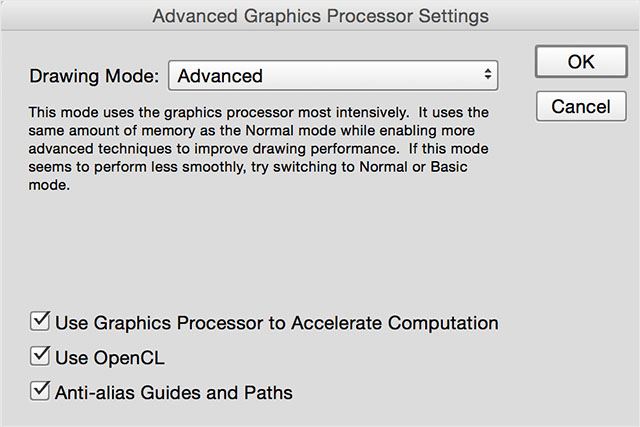
If you are running Windows, you will see an additional setting called ’30-bit Display’ that allows Photoshop to display higher amounts of data on the screen. At the time of this article, Adobe recommends leaving this setting disabled due to bugs with current graphic drivers.
Recommendation: If your GPU can handle it, keep the drawing mode set to ‘Advanced’ and make sure that ‘OpenCL’ is enabled for the best performance.
Scratch Disk
Lastly, before we head out, let’s take a look at the Scratch Disk setting that can be found in the Preferences’ list on the left-hand side of the window. At times, Photoshop may opt to store temporary data on your local drive. If you have an SSD, then you don’t need to worry about twiddling with any of these settings.
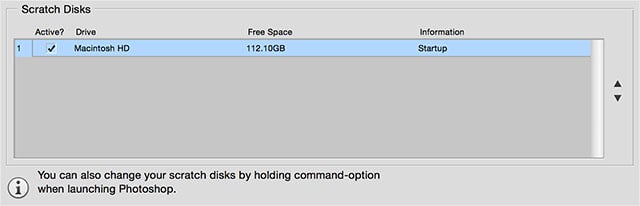
However, if you are still running on a standard HDD you may want to consider selecting a second drive to use as ‘scratch’ space. Using a single HDD for both your operating system and your scratch data will typically result in decreased performance. If you are using an HDD as your scratch disk, you will also want to make sure that the drive is defragmented for fast drive access.
If you have a number of non-system drives attached to your system, you can change the order in which they are utilized. Always make sure that your system startup disk is listed last. If your drives differ in speed, put your fastest drive first in the list.
Recommendation: Use an SSD if possible. If not, consider purchasing a separate drive for scratch space and increased performance.