Astrophotography: The Ultimate Guide
Astrophotography. We hear the term tossed around a lot these days but what actually is it? The true definition of the word is photography of the nighttime sky. The sky only—at night.
Today, even some smartphones are able to engage in the hobby. With all that said, the intent of this ultimate guide is to be a one-stop shop for ALL things astrophotography. As you read deeper, you will find that astrophotography comes in all forms of shapes and sizes, all the while being easier and cheaper than ever before to engage in.
Table of Contents
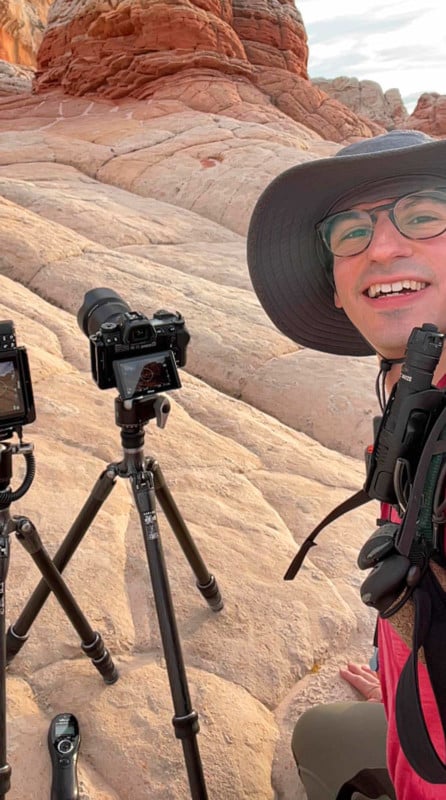
So, who am I? My name is Dan Stein. I am a hobbyist astrophotographer based on the East Coast USA. I have been practicing astrophotography for over 10 years now and am continuing to explore. I used to work at a Planetarium in college where I fell in love with the hobby with just a simple entry-level camera and tripod.
My goal is to make this hobby accessible for anyone to try and see if it is for them. All the while, enjoy the beauty of our universe and deepen your connection with it and learn a thing or two about light pollution along the way. Please follow me along on this journey, as our universe is always expanding.
So with that in mind, let’s go over a really brief history.
A Brief History of Astrophotography
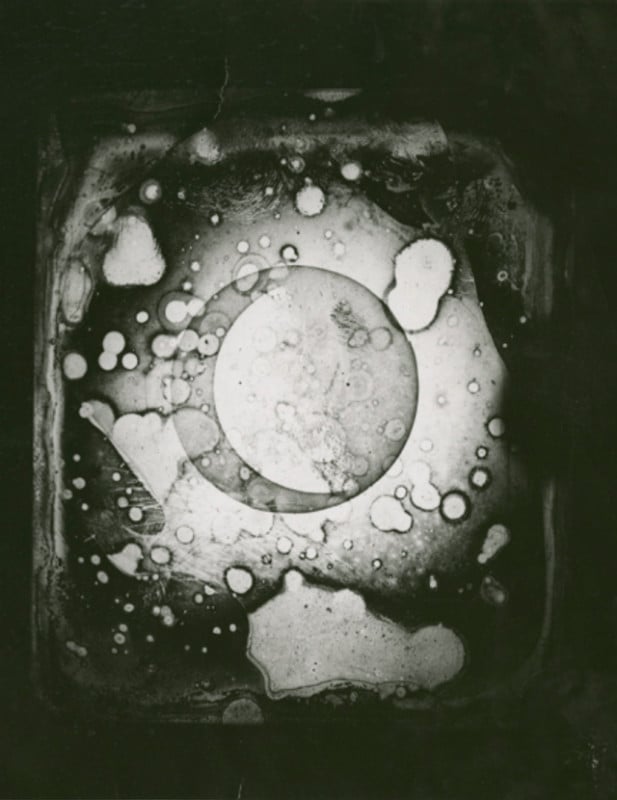
The first ever astrophoto was taken of the Moon in 1839, but it was no stunner. The technology was not quite there yet to be able to properly track the sky, and flimsy telescope design led the Moon to become a blurry mess. Additionally, the limitations of the current wet plate daguerreotype process made imaging slow and extremely inefficient by modern standards.
About a year later, John William Draper of NYU was able to successfully expose his 5” diameter telescope for 20 minutes to create the first-ever successful daguerreotype image of the Moon.
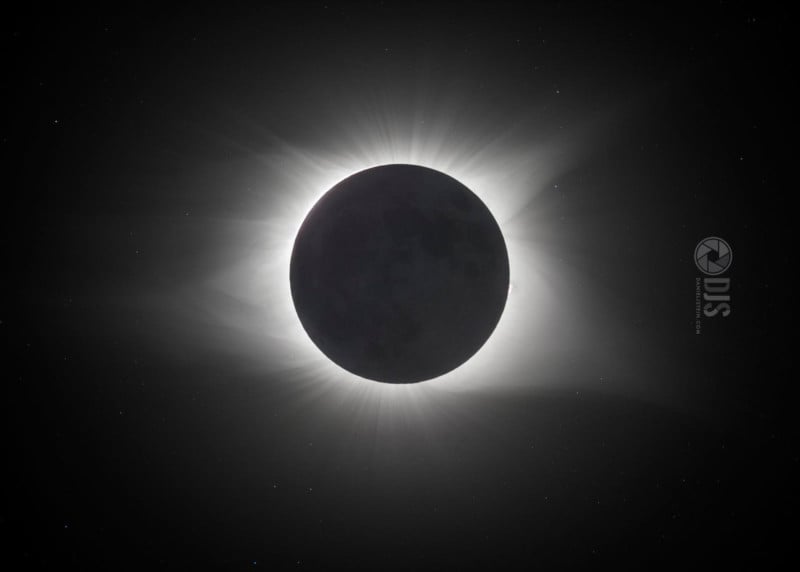
Further on, Léon Foucault and Hippolyte Fizeau of France took their first daguerreotype in 1845. Then on July 28, 1851, the first successful daguerreotype of a total solar eclipse was taken by the group efforts of Dr. August Ludwig Busch and Johann Julius Friedrich Berkowski.
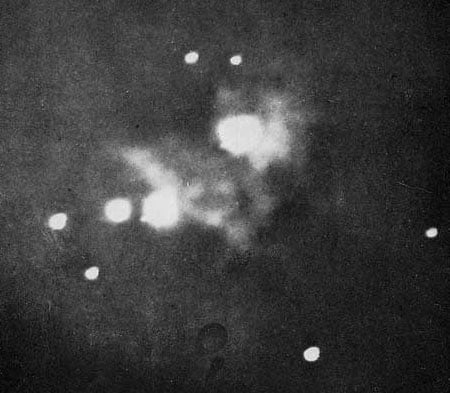
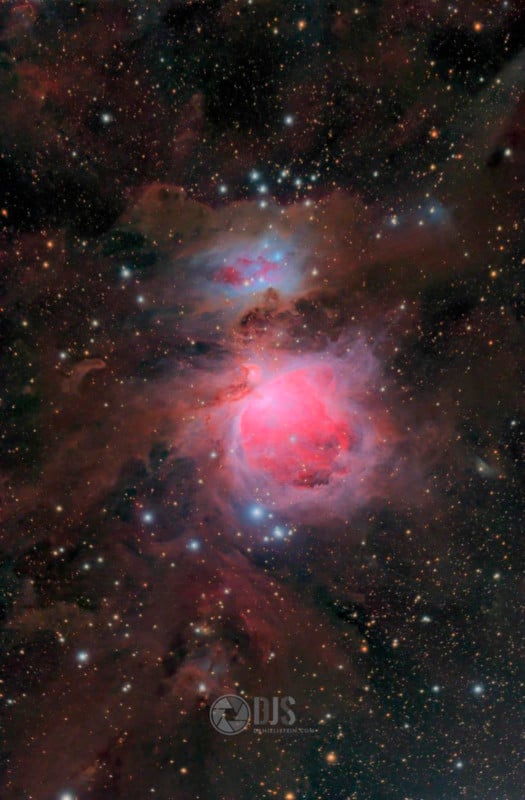
Fast forward to the late 1800s and dry plate technology was invented thus allowing for exposure of distant bright stars and nebula. In 1880, Henry Draper became the first individual to ever image a nebula—Messier 42, Orion.
Moving on to the 1970s and after many years of development in telescopes and film, the first digital CCD sensors were used with brand new types of telescopes that had large mirrors capable of imaging some of the faintest objects. The breakthrough in digital technology led to the launch of the Hubble Space Telescope.
What once took hours to get even a faint sight of an astronomical object can now be found on our phones at the push of a button. So let’s dive in and explore the wonderful universe (pun intended) of astrophotography.
Types of Astrophotography
One of the best parts about astrophotography is that I firmly believe there is something for everyone on any budget. Plenty of people like to go on hikes and take pictures of the Milky Way, while some want to just stay in their backyards and set up a telescope. So let’s talk about the different types:
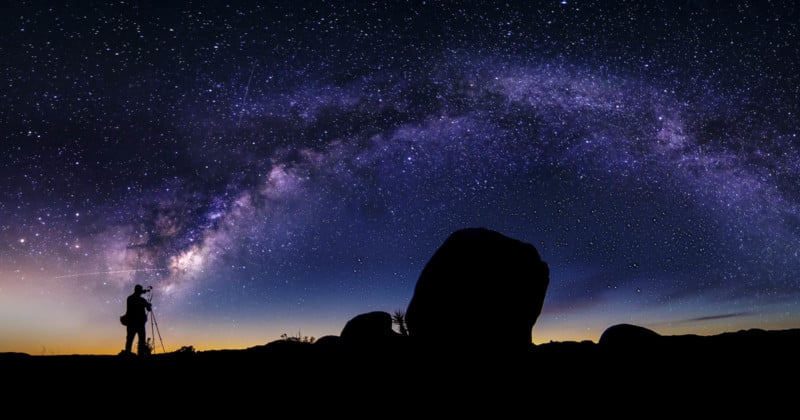
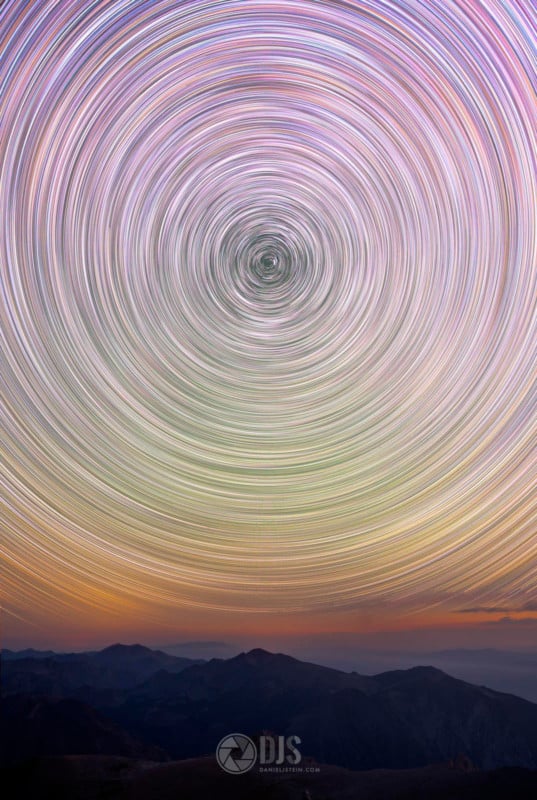
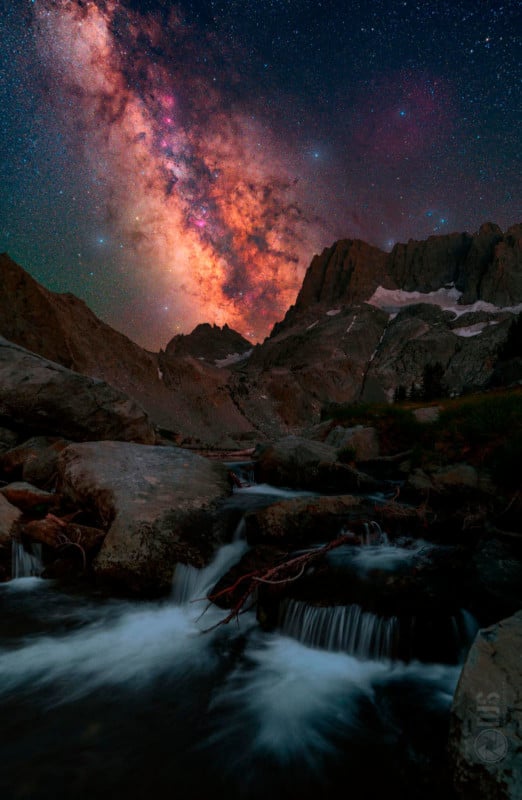
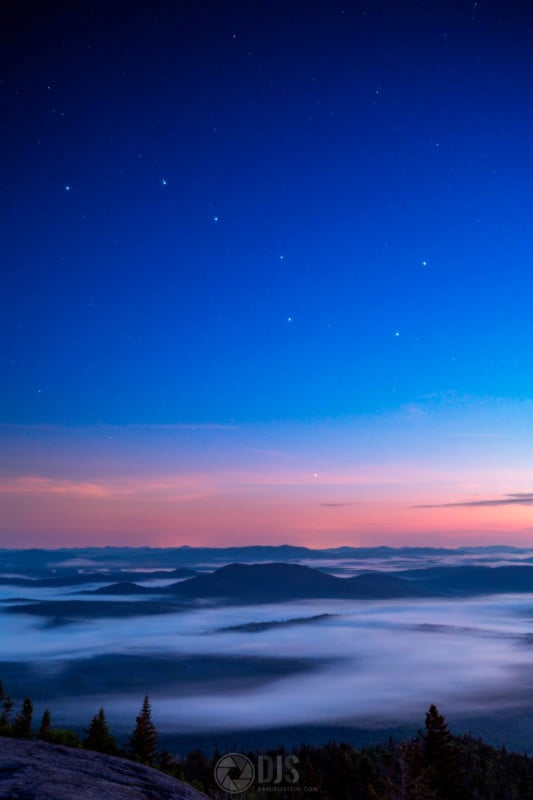
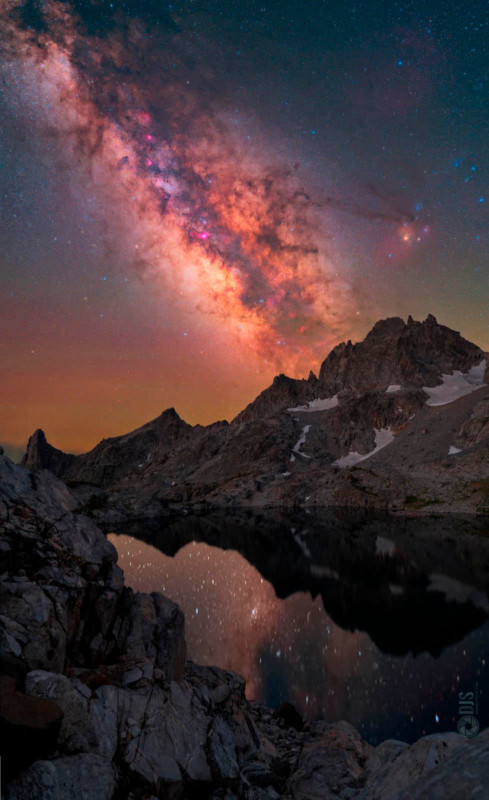
- Nightscape/Landscape. Images of the Milky Way that feature a landscape element in the foreground — an mountains, aurora, and star trails, for example.
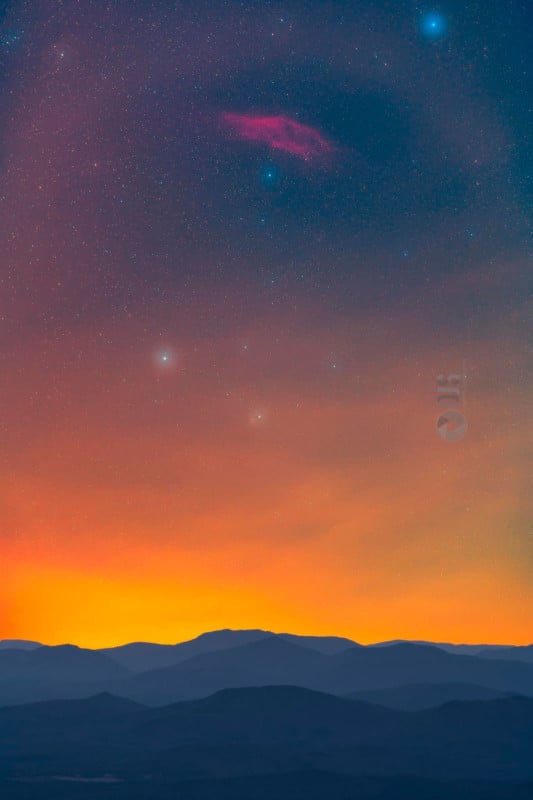
- Deep Space. Images of distant nebulae, stars, galaxies, and more.
- Solar System. Images of planets, the international space station, and satellites.
- Solar/Lunar. Images of the sun, moon, and eclipses.
- Everything Else. Timelapses, comets, examples of light pollution.
This article is going to break down each and show you the tools you need to pretty much do anything. Because there is some overlap between categories, however, I will first go over tools and things to know that are applicable to all genres before diving into specifics.
How to Find Clear Skies
First and foremost, clear skies. This may be easy for some, or an ongoing battle for others. For those who live in the desert, great news! But for those who are stuck in a relatively wet climate like me… oh boy this is a doozy. Either way, let’s find out how we can figure out how to find clear skies.
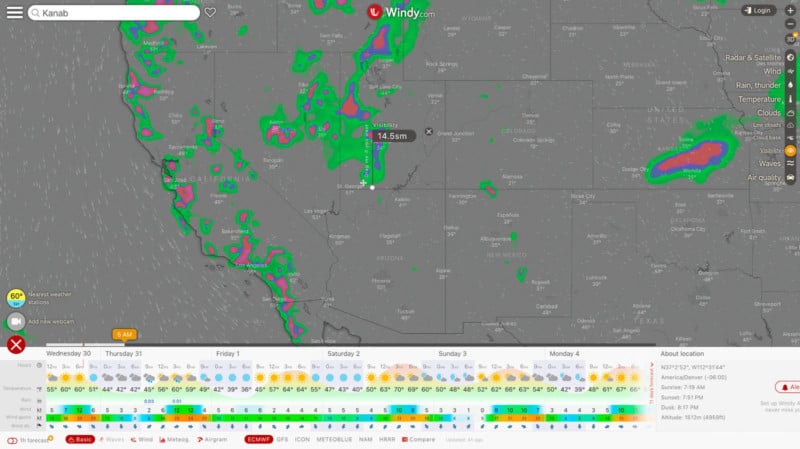
- Windy.com. Free sophisticated global forecasts, option for paid forecasts that go further in depth.
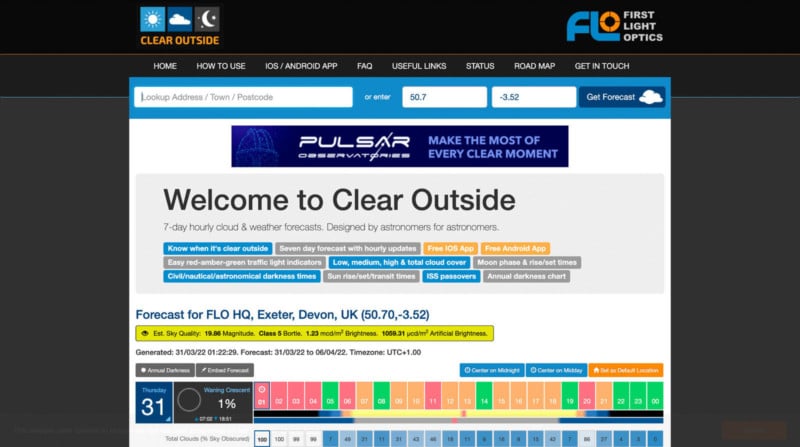
- Clearoutside.com. Free global forecasts with specific criteria for astrophotography.
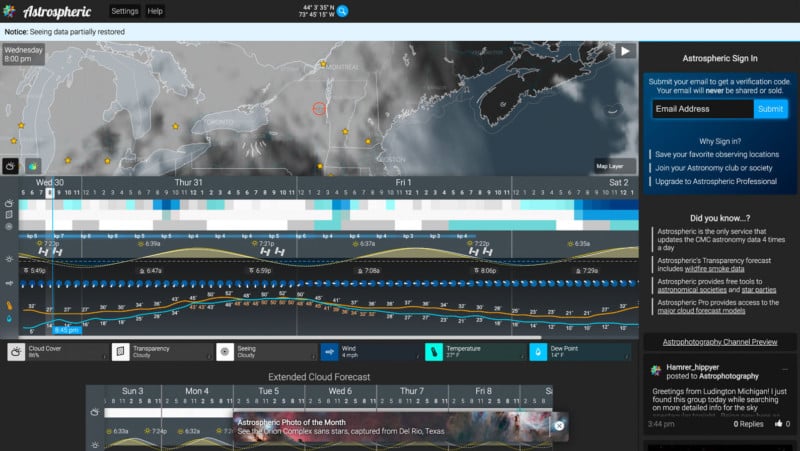
- Astrospheric.com. Free forecasts for the US & Canada only which include visual graphics of cloud cover, smoke, and other astrophotography specific criteria.
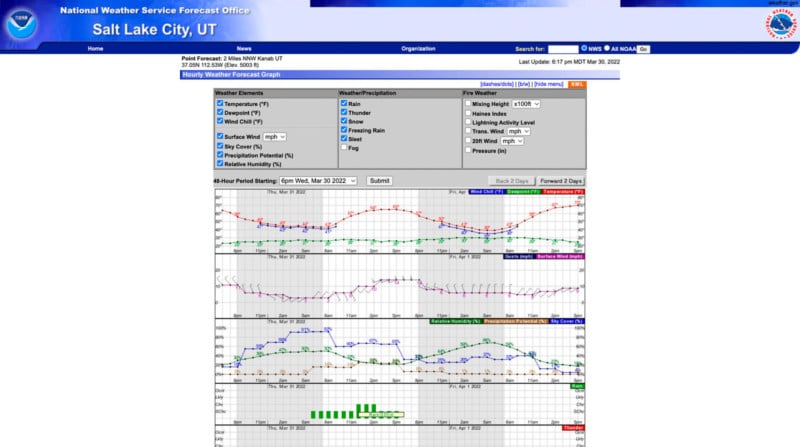
- National Weather Service/NOAA. Free forecasts for the US which also include archiving of previous forecasts for better trip planning and preparation for astrophotography destinations.
- Aurora Forecast. Useful is you are planning on shooting the northern lights!
Note that the above tools (with the exception of the NWS/NOAA) also have free apps for iOS and Android.
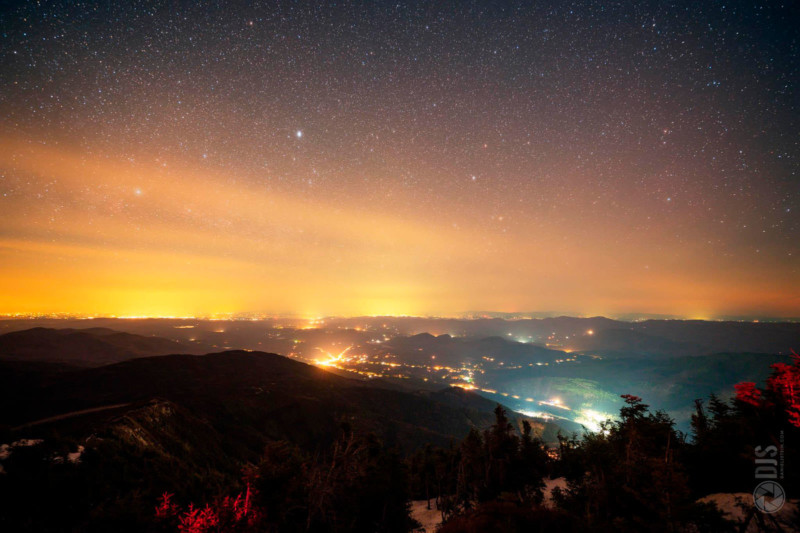
The Problem of Light Pollution
Next, and this is another biggie: light pollution. Yes, sadly the reality is that most of us live in cities or suburbs which suffer from an extreme amount of overuse and misuse of artificial light at night. I happen to live in the 2nd brightest classification of light pollution.

I do want to deviate from the original programming and digress a little about light pollution, as modern astrophotography and light pollution coexist in a very interesting way.
While technology has progressed to make astrophotography easier and more efficient than ever before, that same technology has co-developed to make light pollution denser and brighter than ever before. Light pollution is growing at twice the rate of the population.
Older sodium vapor bulbs are being replaced with LED lamps which certainly are more efficient, but the problem is they are not being shielded to direct light where it is needed. Instead, the scattering of these brighter bulbs has penetrated even deeper into darker skies, and in many cases causes safety hazards due to their glare.
Light pollution has also been linked to breast cancer in women and prostate cancer in men, especially for those who work the night shift. There is also a pattern in light pollution causing the suppression of melatonin and thus altering sleep cycles. Ever wonder why your phone or computer has a night mode function that warms the screen? Think of light pollution like those bright blue phone screens, only you just can’t change it at the tap of a button.
I have published an article and picture book about light pollution which covers these topics in much more detail. You can also consider donating to the International Dark-Sky Association.
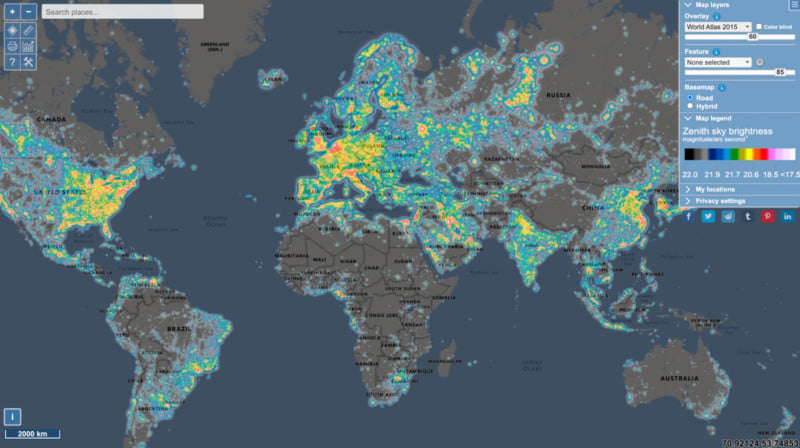
So, back on topic here, how do you know where to “escape” this light pollution? Well, there are two maps that can help:
- Dark Site Finder. This global map illustrates light pollution while also highlighting dark sky zones around the world.
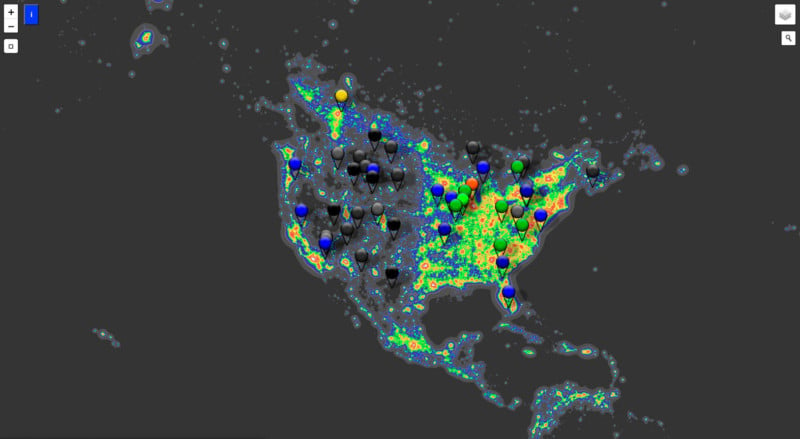
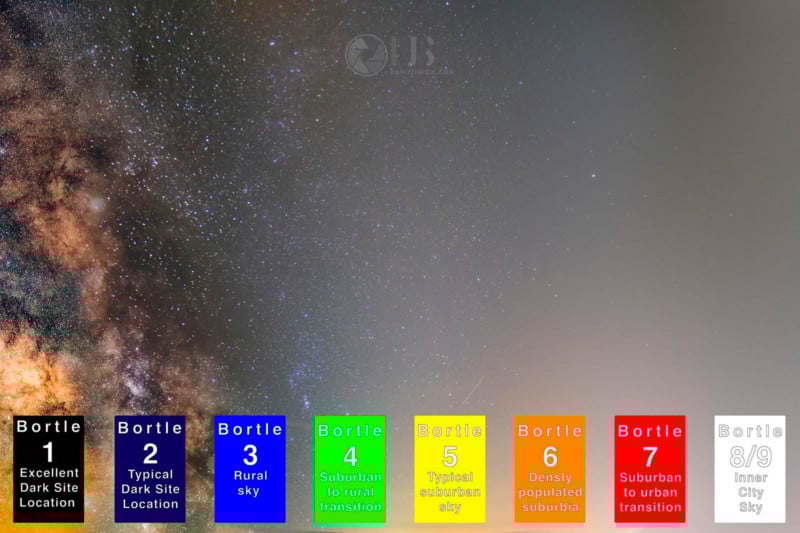
- Lightpollutionmap.info. This global map also illustrates light pollution data, but it goes into further detail. It includes the Bortle scale, which is the most common classification at which light pollution is measured. You can also toggle between data sets which can be helpful in determining localized light pollution specific to an exact location.
Camera Gear for Astrophotography
Let’s talk about cameras for a second. They are all over the place. My best advice when starting out: use what you have. This hobby can get expensive, and until you know it is for you, I think it makes sense to just use whatever body and lenses you own. Even your phone will do. Lots of phones have a night mode that works surprisingly well these days. Technique trumps gear, just remember that.
I will talk more about specific camera types, lenses, and other nerdy stuff in each sub-category.
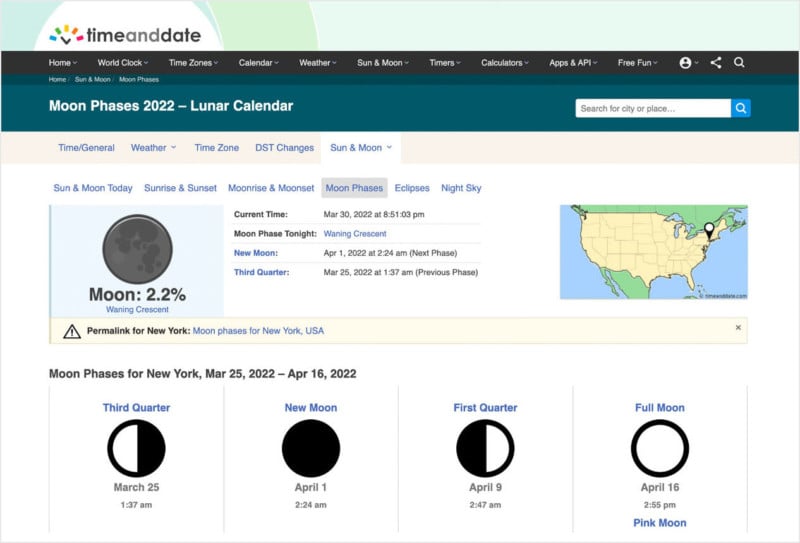
Figuring Out Moon Phases
The next phase (hah) on this journey is figuring out the Moon Phase. Clear Outside and Astrospheric have this functionality built-in, but if you really want to plan ahead, check out timeanddate.com. Punch in your location and scroll to when you want to shoot.
Now, this is where the genres start to differ. As we will discuss in-depth, sometimes the Moon phase matters, and sometimes it does not. When it comes to shooting the Milky Way, for instance, you want a new moon or a moon that does not interfere with when the Milky Way rises/sets. When it comes to deep space—well—with certain filters, that might not matter so much. When it comes to lunar, well yeah that is pretty obvious…
Broad Techniques and Apps You Need To Know
These are imaging techniques that are the most common in astrophotography. Each genre does them differently, but the concepts are applicable across the board.
- Long exposure. Because we are imaging at night, we need to use long exposure settings to allow the camera to see anything.
- Image stacking. This is awesome. When you shoot an image stack sequence, you are constantly taking photos over the course of minutes to hours. Then, you can combine all of the images you have taken using software to reduce the noise and thus come out with a much clearer, more detailed, and noise-free image. Each category does this differently, so I will cover how to do this per genre.
- Tracking . This is where you use an external piece of equipment that your camera will actually sit on to follow the rotation of the earth. This will allow you to take longer exposures of the night sky.
- Mosaics. Space is big, and sometimes you want to get more detail. By shooting a mosaic with a medium to long focal length lens such as a 50mm, you can get more detail than if you were to just stack several exposures from a wide-angle lens.
- Lucky imaging. Similar to stacking, this technique is more commonly used for imaging the Moon, Sun, and Planets. This is also usually done using video mode instead of individual still photos
- Calibration frames. Known as flats, darks, and biases, these frames are more critical in some genres than others, but it is important to understand them regardless of what you are shooting.
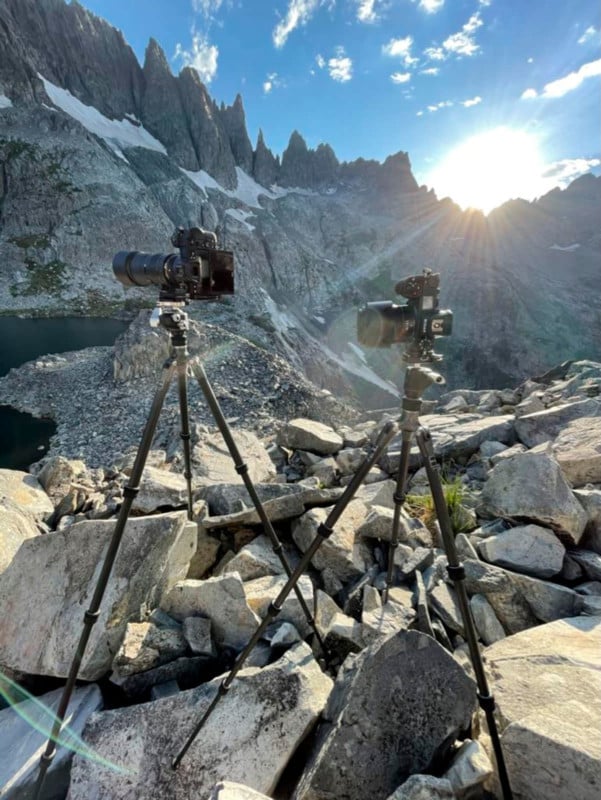
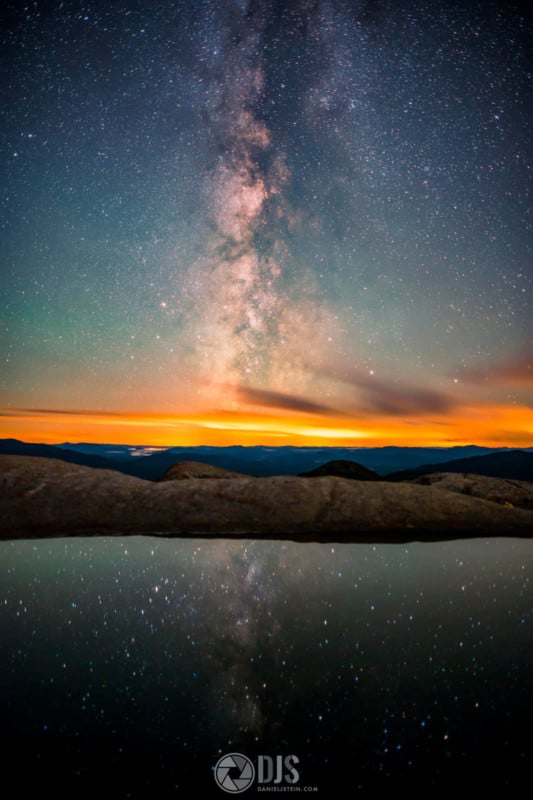
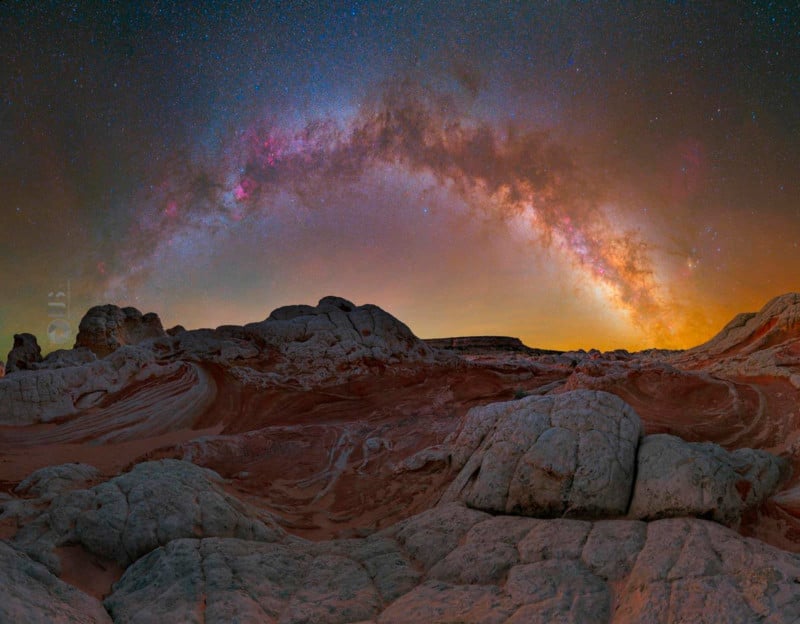
Many of these techniques can be combined as well. For example, the below shot is a tracked mosaic. I used a star tracker and pano head to image it.
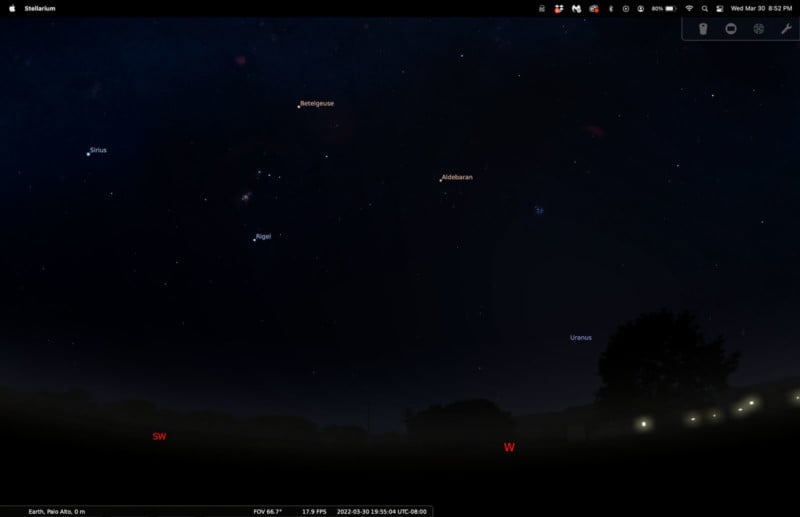
One App That Applies to All Types: Stellarium
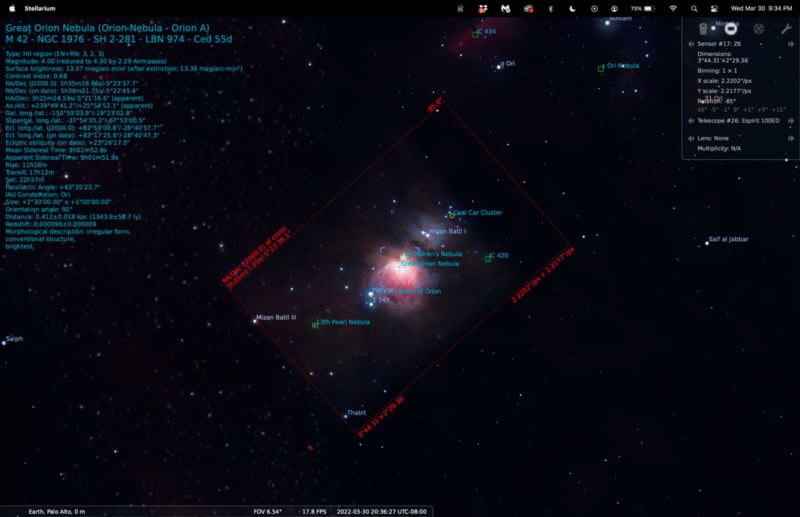
One last thing before we go in-depth as this computer application applies to ALL astrophotography. It is called Stellarium. It runs on Mac (even Apple Silicon), PC, and Linux. This tool is fantastic to play around with and familiarize yourself with the night sky. This will be helpful for taking pictures of anything.
Now that the basic tools are laid out, it is time to go deeper into each major type of astrophotography. Let’s start with what I feel will be the most common here…
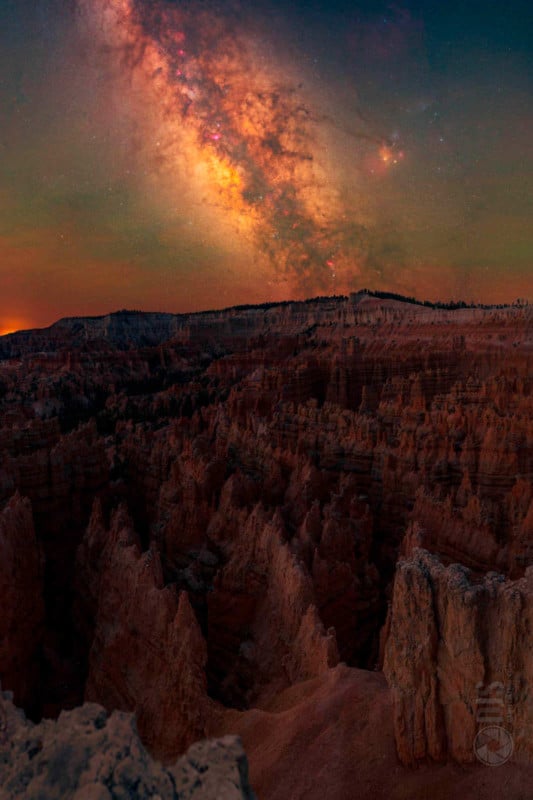
How to Do Nightscape Astrophotography
Nightscape photography is basically photographs of the Milky Way — what we can see in the night sky with the naked eye — that feature a landscape element.
Planning Nightscapes
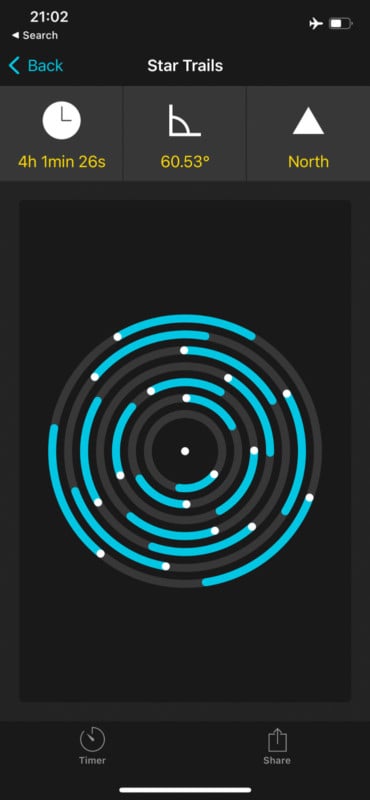
Who doesn’t love a good Milky Way photo?! The cool part about nightscape is I feel like this is the category with the most artistic license. A nightscape is a unique pairing of space and landscape. It can be that Milky Way photo, or it could be maybe the Big Dipper setting, the Orion constellation rising, or how about some star trails? Let’s talk about the best way to plan out any nightscape. First, we will need some extra tools.
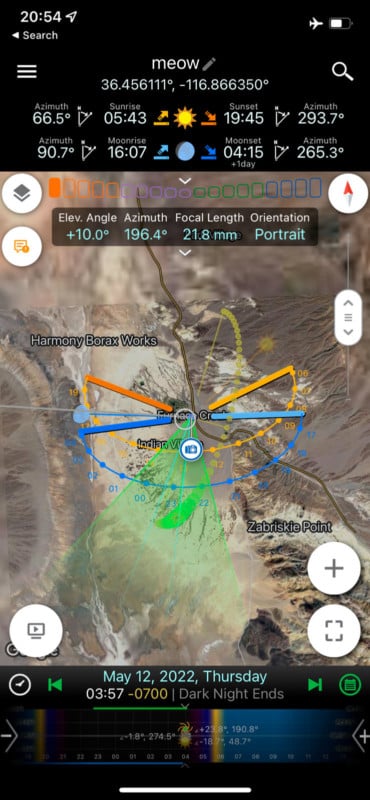
- Planit Pro. This is the ultimate planning app. You can plan out your compositions right down to the focal length. It also has moon phases, a light pollution map, and a landscape simulator built in. The app can be a little complicated and requires some tinkering to use. The app is also paid, but well worth it.
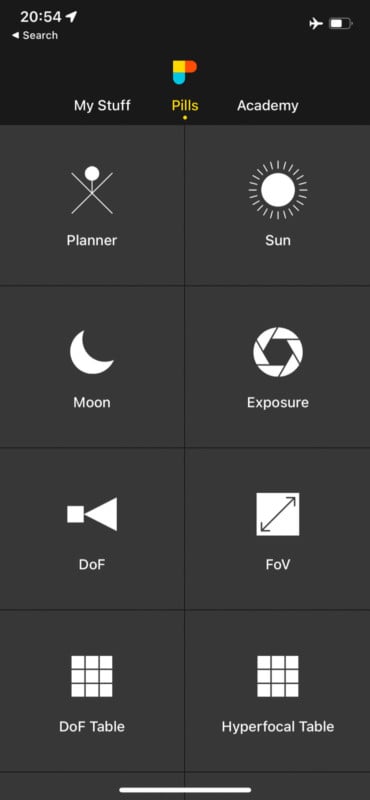
- PhotoPills. This is very similar to Planit. If you do not need the extra sophistication and learning curve of Planit, this app still does it all. It has a Milky Way core locator, moon phases, sunrise/sunset times, etc. The app is paid as well.
- Gaia GPS. This app acts as a hiking planner and also GPS on the trails. It is important to note that using an electronic GPS should never fully substitute a map and compass should your phone’s battery ever run out on the trail. This app also has private land functions built in to determine if the spot is free and legal to access.

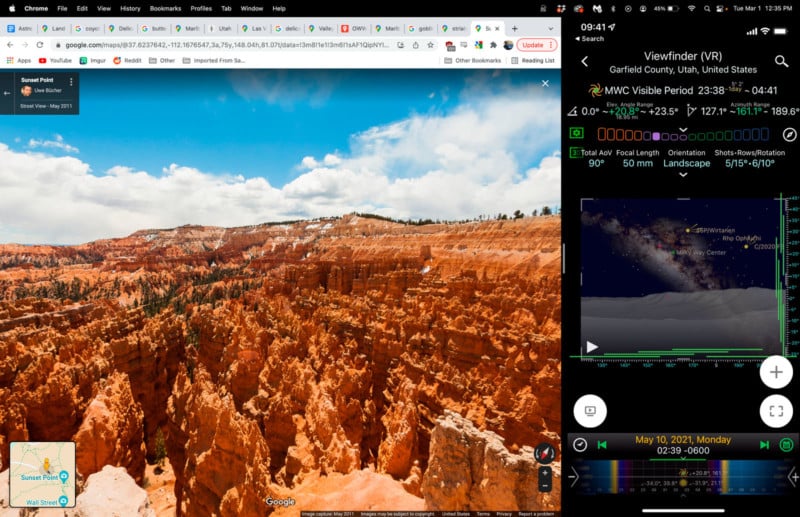
- Google Maps. A great way to map out and plan spots. The StreetView and 360 views are super helpful too. Note, however, that Google Maps should never be used as a hiking navigational tool.

Gear for Nightscapes
In addition to the tools mentioned above, it’s important to have the following:
- A camera with a manual mode and RAW capability. If you are on a tight budget and just want to use your phone, for now, to get your feet wet and see if this is for you, that is okay too!
- Lenses: use what you have for now. Perhaps it is the 18-55mm kit. That will be a-okay. If you do have fast glass such as a 14-24 2.8 or maybe some primes like a 24 1.4, those will work tremendously too.
- A tripod! This is super important, you will be keeping your camera steady for seconds to minutes at a time. A good tripod goes a long way. A ball head is ideal as well.
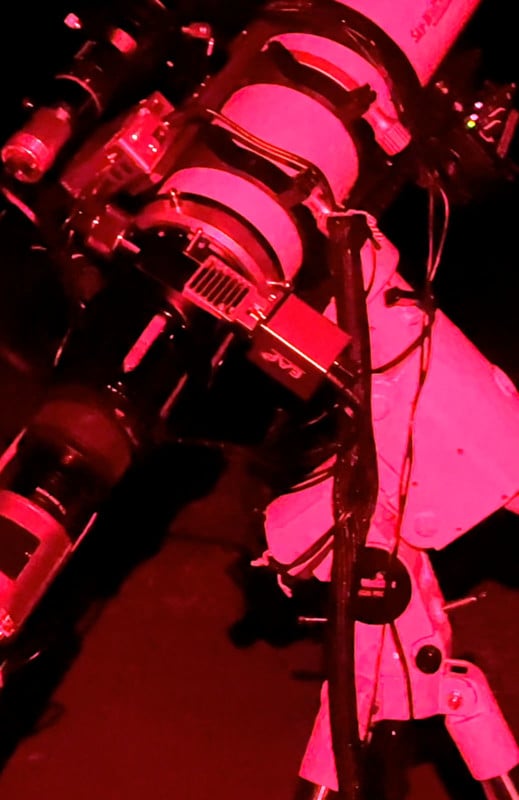
- A headlamp with red safelight. This will allow you to be hands-free when working with your gear and also maintain your night vision at night. A red light will also be required should you ever want to shoot with a group or a star party.
- Optional: remote trigger or intervalometer. This is helpful for firing your camera and reducing shake, but it is not necessarily. You can use your camera’s self-timer function for now if you don’t have one.
- Optional: portable star tracker. Not sure what this is? As we advance in this guide, those wishing to take their astrophotography deeper may wish to purchase one of these.
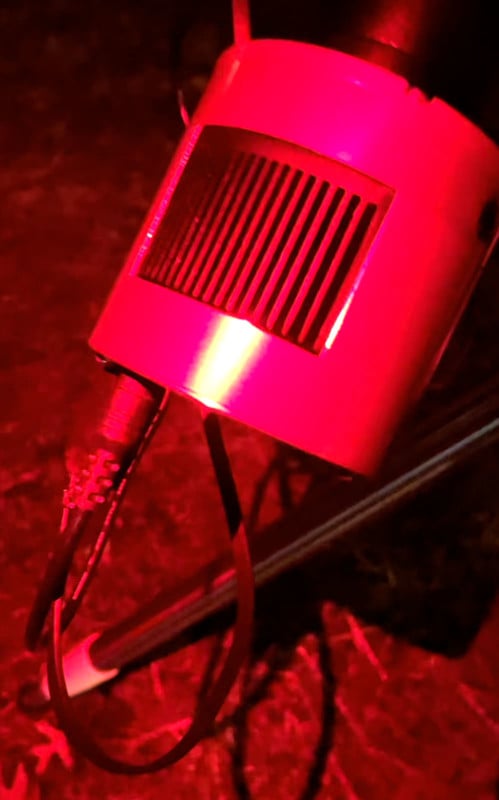
- Optional: dew heater. These super cheap USB-powered Velcro straps can wrap around the front of your lens to prevent condensation to build. Useful in wetter climates where the dew point drops a lot overnight, but not always necessary in a desert.
Planning Nightscapes
Putting it together, how can we use these tools to plan? Because these applications are so intricate, it would be impossible to explain how to use every single feature. Instead, I feel it is best to go over some broad techniques to help you use them in any situation.
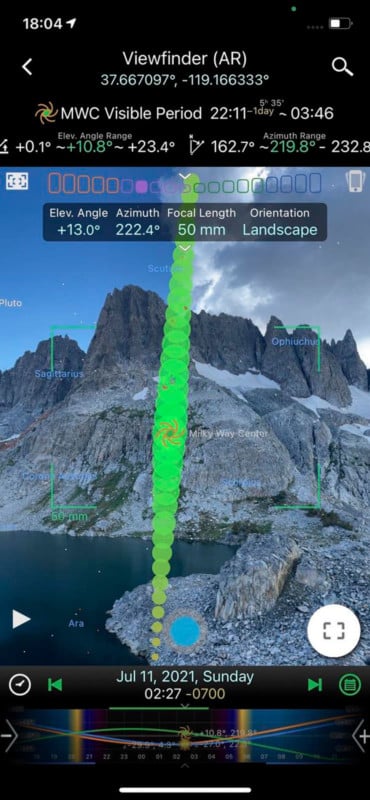
First, figure out what you want to shoot. Is it the Milky Way? Or maybe star trails? Or how about a shot of the Orion constellation? Use Stellarium to figure out what is calling you. You can plug in the dates and times as well to see when the target you want to shoot is visible.

Additionally, use PhotoPills and Planit to figure this out. Each app has a planner mode that tells you this information. The disadvantage here is the smaller phone screen and lack of a full “planetarium style” view may make it difficult to determine when targets rise and set. PhotoPills has a specific function for the Milky Way core, Moon, and Meteor showers, while Planit also allows you to type in some popular nebula and galaxies as well.
These apps will tell you what direction the target you want to shoot rises and sets. Then, you can combine that knowledge with what time the Moon rises and sets on the night you want to shoot to figure out if it will interfere.
Next, find a dark sky. Use the light pollution map or the light pollution tab on Planit Pro to figure this out. My recommendation is to look for a Bortle 4 or below. The darker the better.
If you found a spot but are not sure what the legalities are to it, then load up Google Maps and Gaia to see how to access it.
This brings me to my next point. Is the spot you want to shoot from a location that requires hiking and backpacking? Map that out in Gaia and see what the distance, gain, and terrain are. Then, you can plan your hike accordingly taking into account the additional weight of your camera gear. You can also figure out with Google Maps how long the drive will take to get to the trailhead, etc, but as mentioned previously you should never navigate a hiking trail with Google Maps. A dedicated hiking app like Gaia, a GPS unit such as the ones from Garmin, or a paper map and compass are far safer.

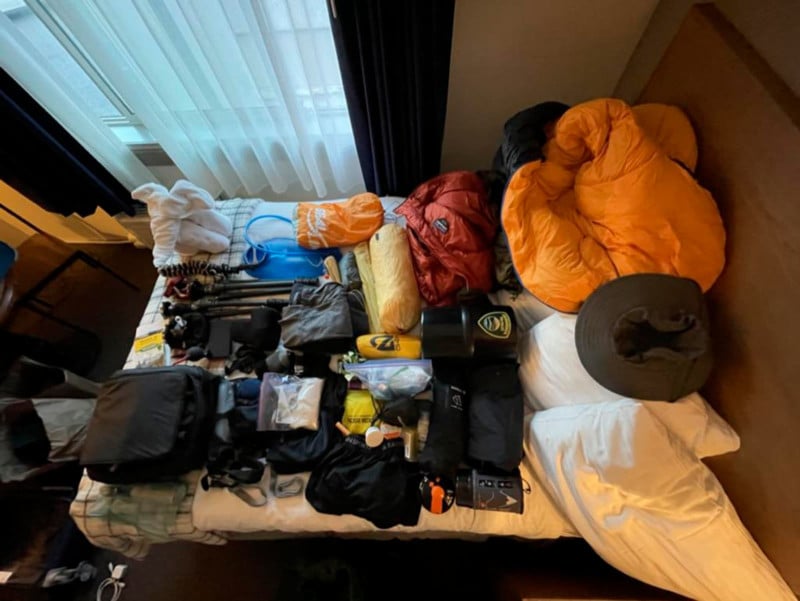
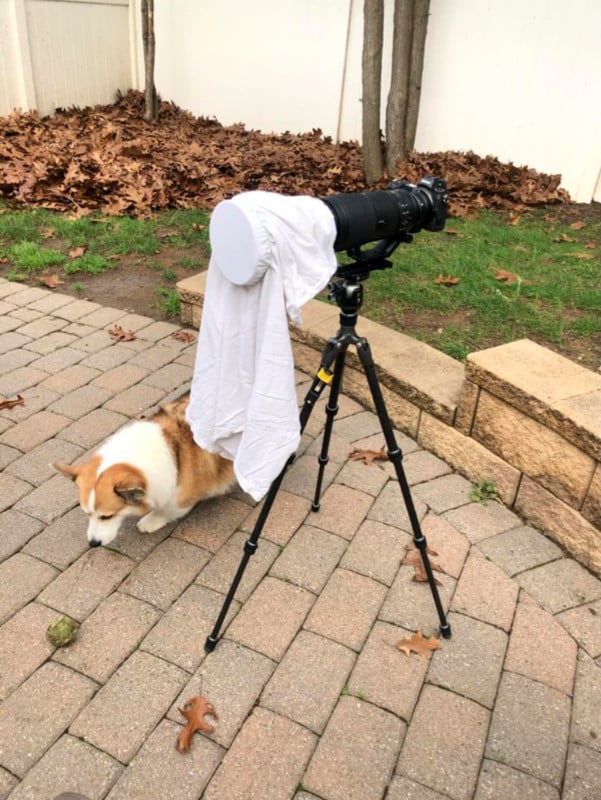
Sidenote: Since I personally hike to most of my locations, this is my preferred method. I will typically have all of my hiking and backpacking gear ready to go, then I have my camera gear packed in a camera insert. This technique is a mileage-may-vary type of thing. I know many who prefer to hike with minimal camera gear and just wrap their gear in clothes so it stays safe. This guide is geared towards everyone though, not just those who hike so I want to keep the hiking talk to a minimum.
Ok so now you have your dark sky, and enough of a plan to figure out how to access it, then what? Well, let’s talk about camera settings, using a tracker, and stacking for Nightscapes.
Tip: When you are out in starland, be sure to let your eyes adjust for 15 minutes, and follow the steps using red safe light to keep your eyes dark adapted.
Shooting Nightscapes
Initial Settings
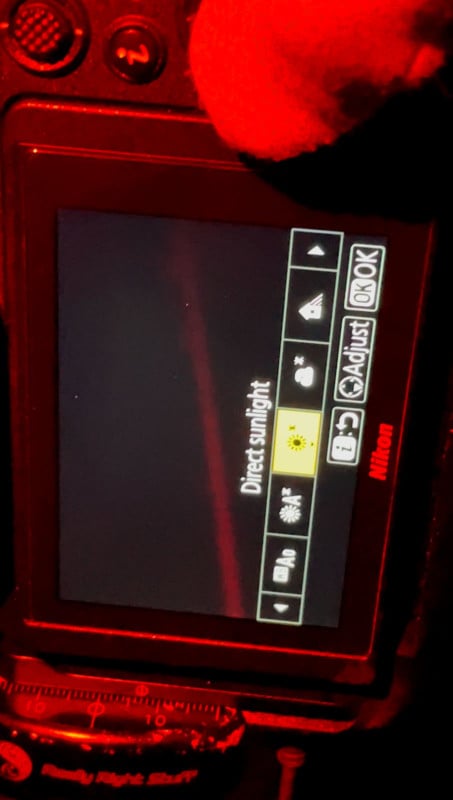
Plop your camera on a tripod and make sure it is secure. You will need to place your camera in Manual (M) mode. Set it to shoot in raw, and use the daylight white balance setting. Manual will allow for full control of the camera, RAW will allow for better post-processing, and a daylight white balance is used as that is the color temperature that most represents a “true” night sky so it is a good starting point. Raw mode will allow that to be adjusted effortlessly in post-production if the warmer tones aren’t your style.
Next, put your camera in live view mode (if using a DSLR). This will blackout the optical viewfinder but make it easier to use the screen to compose your shots. Live view is also crucial for focusing which is the next step. If you have a mirrorless camera, your camera is “always” in live view.
ISO
Noise is not a product of ISO. Lack of signal is. ISO is the “volume dial” essentially at which you can adjust your camera to in an effort to “brighten” your shots. It does not compensate for a lack of light. This will become easier to explain when stacking and tracking are discussed.
Crank up the ISO to about 400-128000 depending on how dark the sky is, and open the aperture way up to the maximum possible for your lens. We are trying to let in as much light as possible since everything around you is so dim.
Note that some cameras are ISO invariant and dual gain. In layman’s terms, this essentially means that adjusting the ISO by moving the exposure slider in post-production software is the same as adjusting it in-camera. Be careful with this though. Not all cameras are invariant and you still do not want to over-expose. Most Nikon, Sony, Fuji, Panasonic, and Pentax cameras are invariant. Nikon and Sony mirrorless are also dual gain, which means shooting at certain higher ISO’s can yield less read noise. Canon is a little all over the place and usually needs to be exposed perfectly in-camera. Be sure to plug in your specific model here.
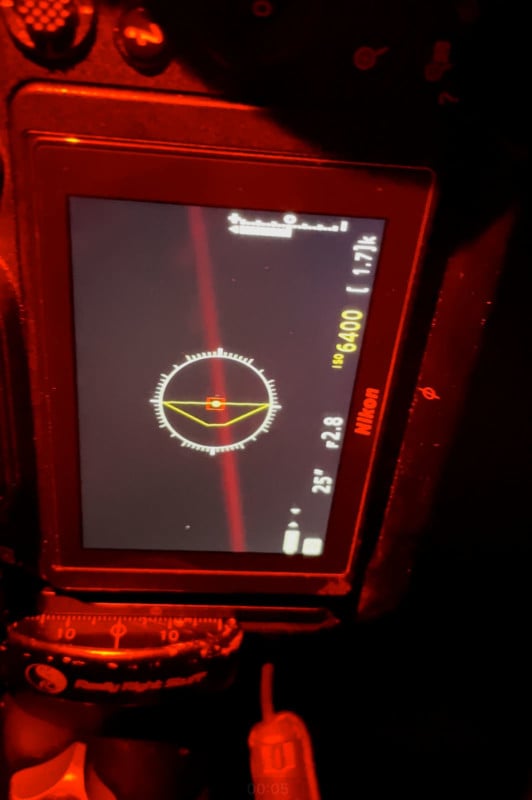
Focusing
Put your lens in manual focus mode and zoom out all the way to the widest focal length if using a zoom. Use the widest aperture you have available, the lowest f/number (for example f/3.5) Then try to vaguely focus by moving the focus ring to the infinity marking on your lens. If it does not have that marking, try moving the focus very slowly until stars start to make their way visible in live view.
Next, find a bright star and use your tripod head to place it in the center of the screen. Press the little magnifying glass button on your camera which will enable a digital zoom feature. Press the zoom button until it is as big as possible on your screen. At this stage, gently rack the focus back and forth until that star is as sharp and pinpoint as possible. This can be tricky, so be patient and if you can’t find a star to work with, try a bright distant object. Keep in mind if you are using a zoom lens and change the zoom, you will need to refocus.
Shutter Speed
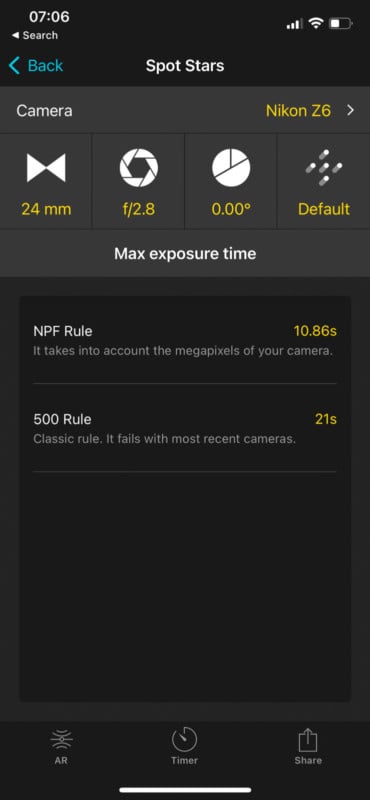
After focusing, you will need to calculate your shutter speed. We know this Earth isn’t flat so it rotates and thus too long of a shutter speed will blur the stars. But, too short of a shutter speed and the shot will come out too dim.
To calculate this, we use the NPF Rule. You may have heard of the 500 rule, but as digital sensors have progressed that rule became less relevant. The NPF is super precise and takes into account the many parameters of your specific setup. Both PhotoPills and Planit Pro have this function built in, or use the calculator here.
This is where having a wider lens will help, something between 14-24mm is nice for a widefield view. Remember to take into account your crop factor if you are not shooting with a full frame camera. Something like a 70-200mm zoom is great for events or sports, but it will make your shutter speeds super short because it does not take much time for a star to move across the frame since everything is “bigger.”
Determining Exposure
This is where things begin to get a bit technical, but I am going to try and keep this as concise as possible.
We need to use the histogram to determine how bright or dark our image is. This is a more mathematical approach to determining what needs to be adjusted and as a result, it is far more precise than just visually guessing if we are doing it right. First, let’s discuss what the histogram looks like in several scenarios, from darkest to brightest.
- Underexposed: The histogram is displaying the bulk of the image data in an area where it is too dark. This is known as underexposure. It will be difficult to work with this image as the data is so dark, noise may appear when attempting to recover it.
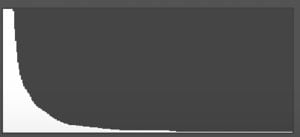
- Exposed to the left: The data exists in the darker zone of the histogram, but is far more workable than if it is underexposed. Most Milky Way shots tend to have this representation.
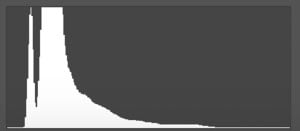
- Median exposure: The data is mostly concentrated towards the center. Nothing is over or underexposed.
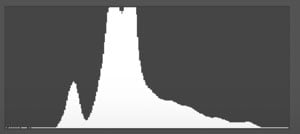
- Exposed to the right: The opposite of exposed to the left. Most of the data resides in the brighter parts. This is common when photographing in light pollution or with the moon out. Data can be used, but can be sometimes be difficult to recover the highlights.
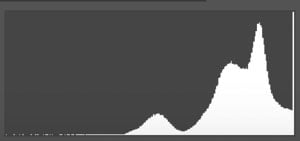
- Overexposed: Everything is too bright! Most likely, the highlights are overblown and the image data cannot be used or recovered.
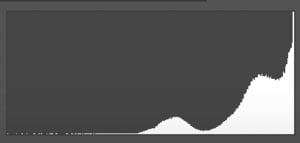
Now that we know how the histogram curve may appear, you can use this to determine if your image needs adjustments. For example, if your image is underexposed, increase your ISO. Likewise, if your image is overexposed, decrease it. You can also use the aperture and shutter speed to make these adjustments, just be sure you are not making your shutter speed too long otherwise your stars will begin to trail.
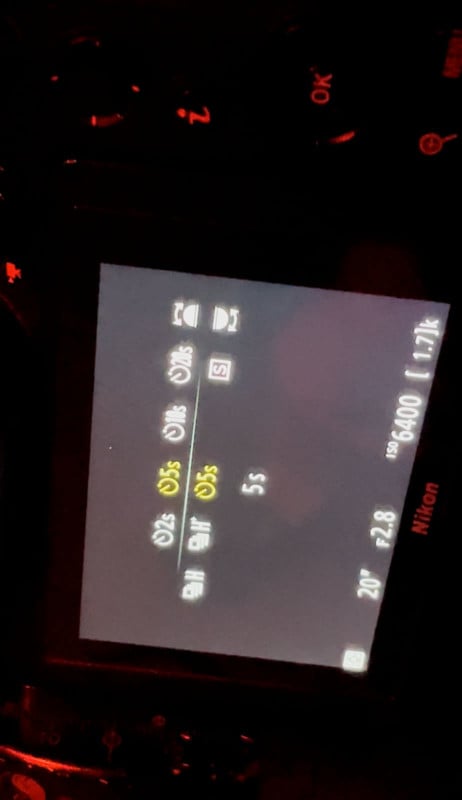
Composing
Compose your shot by moving the camera on the tripod and taking quick 2-3 second exposures at a mega high ISO. This is just to see if the final result of the shot is going to be something you are happy with. When you are satisfied with a composition, turn on the camera’s self-timer release mode, lower the ISO down to what was discussed above, then let it rip. The self-timer will ensure there is no shakiness interrupting the shot after the shutter button is pressed. A remote trigger will help with this too.
A Summary of Settings
Putting it all together—a quick 1-2-3 rundown of all the settings:
- Shoot in raw.
- Focus: set to manual.
- White Balance: set to daytime.
- Aperture: as wide open as possible (lowest number, e.g. f/2.8).
- Shutter speed: calculated by the NPF Rule depending on your focal length.
- ISO: anywhere from 400-12800 depending on the histogram as discussed above.
- Use the self timer delay or external remote to trigger the shutter
- Shoot!
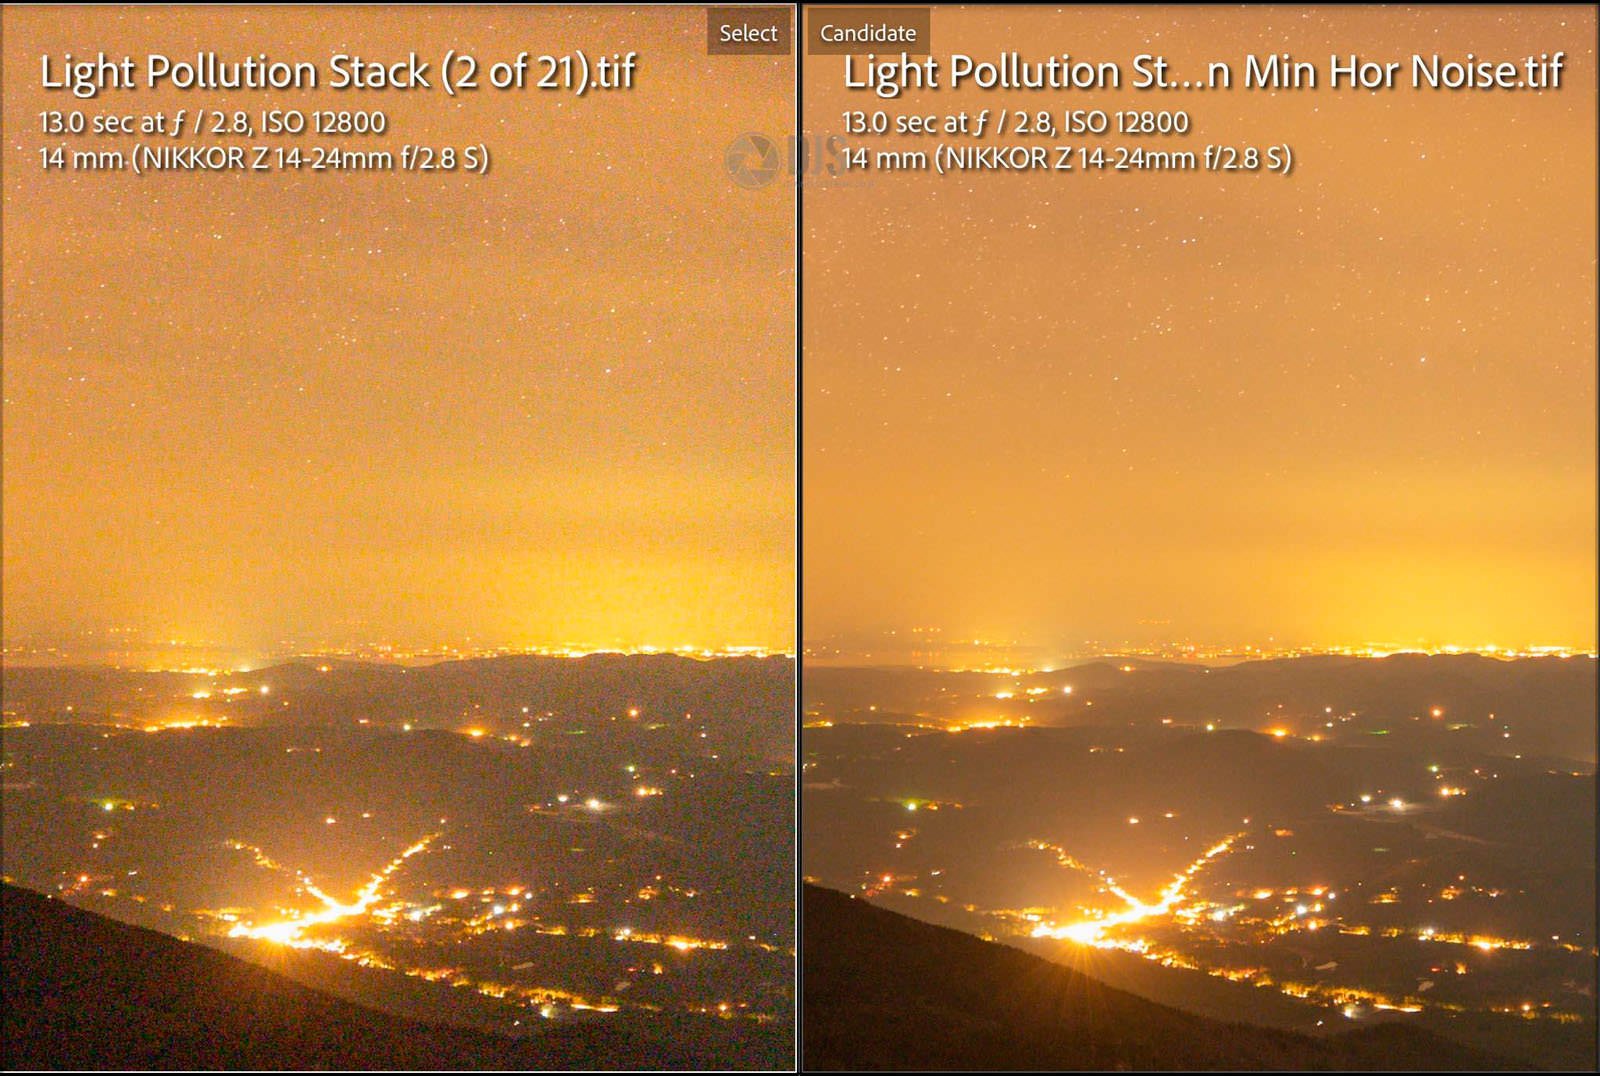
Stacking Nightscapes
As discussed briefly above, this is where images are taken consecutively over time and then superimposed or “stacked” using software to create a cleaner image. This is helpful if you are using a phone or camera which tends to be very noisy at night. Stacking will reduce that noise the more shots you take.
Having an intervalometer is nice here, as you can program it to complete the entire stack sequence for you at the push of a few buttons. If you do not have one at first, that is okay. Just be mindful that you will need to keep triggering your camera manually to shoot each shot.
Calculating How Many Shots You Need
The more shots you take, the cleaner the output stacked image will be. But, there is a point where diminishing returns kick in. To keep things simple for this article though, I do not think that is something to worry about. Focus on shooting anywhere between 2 minutes to 30 minutes worth of shots, depending on what and how you are shooting. For deep space stuff, you will want much longer stacks, but this will be further discussed in the deep space section.
Use your intervalometer or phone calculator to figure out how long the sequence will take. So let’s say according to the NPF Rule you are going to have a 15-second shutter speed at f/2.8 and ISO 3200. If you dial in that you want 7 shots with a 1-second interval in between, that would be 112 seconds spent shooting. That is a pretty okay chunk of data, but you can still get some more and get an even cleaner shot.
A Few Hot Notes
- Like I said, the more shots you get the better. If you find you are using a higher ISO like 6400 and above, it would be wise to get more shots.
- If you are pressed for time in any way. For example clouds are rolling in, you gotta leave, you want to take other shots, your sandwich is getting cold (Please don’t feed the wildlife), etc. then shoot less.
- The tradeoff of shooting more shots is less noise and thus more detail.
- If I personally am stacking I will usually go for 10-30 minutes of data for my nightscapes.
- You can even stack your long exposure foreground images for even cleaner results there.
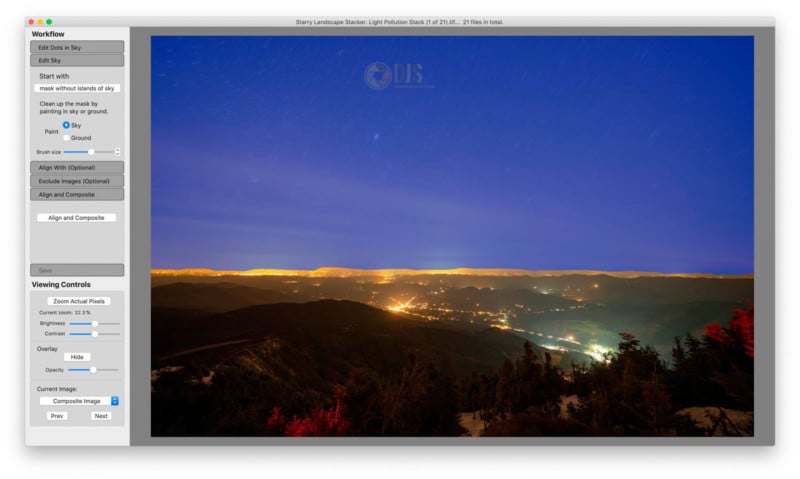
- Stacking software I recommend is Starry Landscape Stacker for Mac or Sequator on the PC. Both are excellent and very intuitive.
Star Tracking for Nightscapes
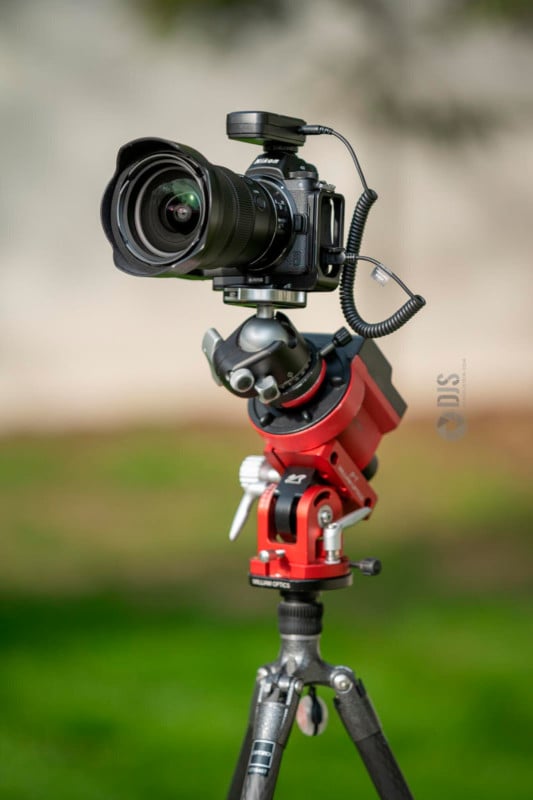
So what in tarnation is a star tracker? Sounds like something they would use in Star Wars.
A star tracker is a motorized device that when properly aligned can follow the Earth’s sidereal rotation and thus compensate for the relative movement of the stars. The rotation of the Earth is why we need to use the NPF rule to shoot the stars. Otherwise, the stars will begin to trail if the shutter is dragged out too long. This means that we can expose shots of the stars for much longer.
You may at this point have started researching a new lens to pick up for astro work. And this is precisely where I would say freeze. Lemme tell you a little secret…. your money is much better spent on a tracker than it is on new glass. Now okay. Full disclosure. A tracker is not going to entirely replace the need for a new lens, but it will essentially bring new life to your current lenses. You are still far better off buying a $250 tracker over even a $500 lens because of how much capability these things have. I will stand by that statement to the fullest.
In astrophotography, many characteristics of using a lens in the day become irrelevant. For example autofocus speed, depth of field rendering, etc. But on the counter, some distortions not typically seen during the day make their way into astro shots—such as coma, astigmatism, and longitudinal chromatic aberration (loCA).
A Tracker Will Increase Detail in Your Astro Shots
I mean who doesn’t want the juiciest astro shots out there? This again goes back to longer exposures. Remember what I said above about ISO. It is a volume dial. Longer exposures will allow you to not only stop down enhancing the sharpness of your glass as mentioned above, but you will be able to lower your ISO because you are getting so much signal from the longer exposure. You do not want to overexpose even with ISO invariant cameras. The images will be brighter due to longer exposure time which means the ISO must be lowered to compensate. More signal, less noise.
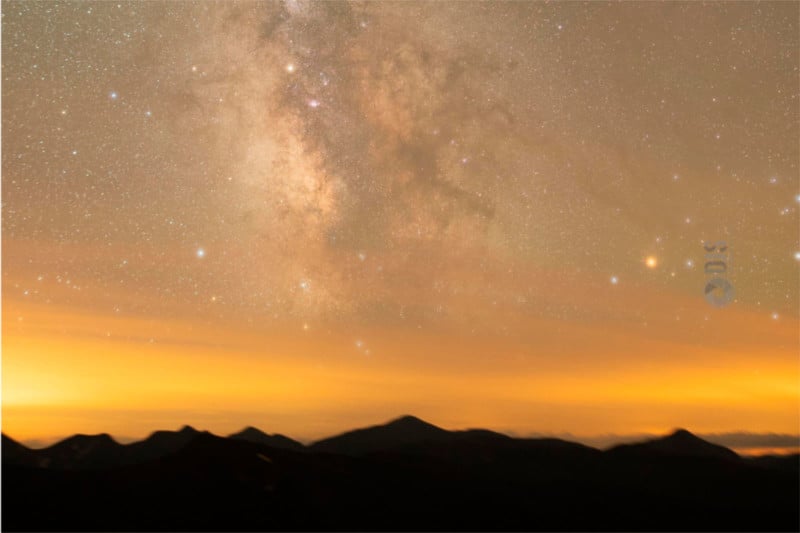
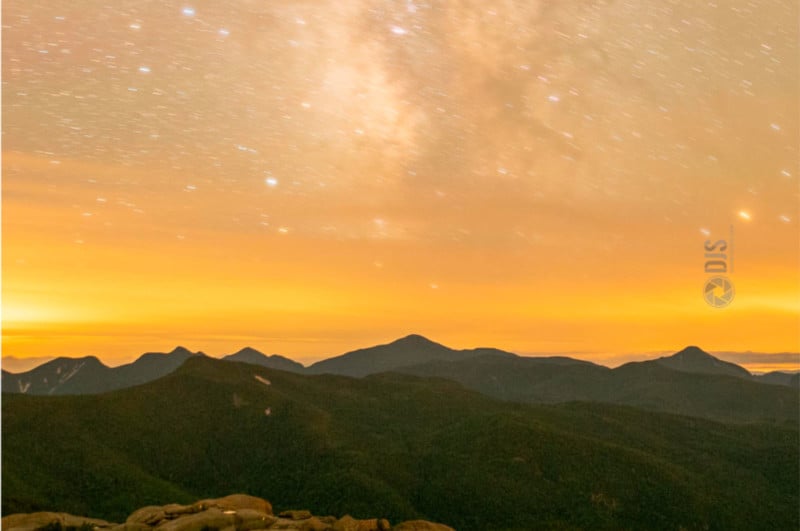
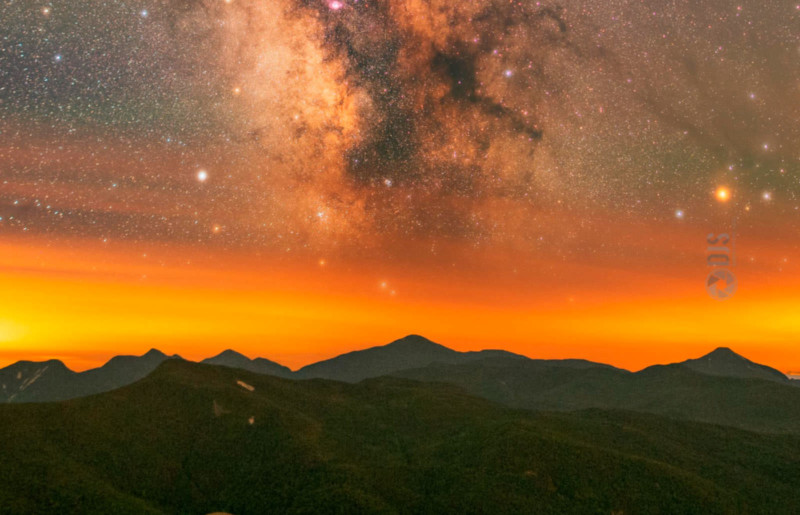
Check out this comparison between an untracked and tracked RAW file. The same camera and lens were used in this setup. Notice how also the stars are much sharper in the tracked shot? This is because I was able to stop down as a result of taking advantage of longer exposure.

The Caveat: Trackers Require More Work
With every action, there is an equal but opposite reaction (I guess that kind of works in this sense)? What I mean by this is a tracker not only requires more work to use and set up, but it is an additional item to keep in your bag, take on hikes, and travel with. I personally think the added bulk is worth the results, and I hike with mine and will always bring it, but it just needs to be said.
Also, and this is a biggie, you may be wondering what happens to the landscape when the tracker is rotating your camera. You guessed it, the landscape becomes a blurry blob! Something has got to become blurry in this equation, and that is just the way the cookie crumbles. To combat this blurriness then, you will need to shoot an additional shot(s) with the tracker off and use Photoshop or Gimp or other software to mask and blend them together.
However, I see this as kind of an upside as it allows you to take separate, long exposures of the foreground and thus have a nightscape shot that isn’t just a silhouette of the landscape.
Trackers also require you to be in a location that has access to a clear view towards your celestial pole (Polaris for Northern Hemisphere, Southern Cross for Southern Hemisphere) to properly align them. This is called a Polar Alignment. I rarely find this to be an issue though. But of course, your mileage may vary depending on where you are shooting so it needs to be said.
Choosing a Tracker
Trackers come in all sorts of shapes, sizes, and price ranges. You can even make them yourself for like 20 bucks if you are handy. I have seen some of the cheapest models on the market listed for like $80 that are perfectly capable of handling something like a Canon EOS Rebel and lens.
I am not going to get into the specifics of which one you should buy in this guide, but if you have already done some preliminary research on a model or two you are eyeing up, feel free to let me know in the comments below and I can chime in with my recommendations based on your budget and what you want to shoot. Since we are talking about widefield nightscapes, however, models to keep in mind are the Sky-Watcher Star Adventurer (both Pro and Mini), iOptron Skyguider Pro (what I use personally), iOptron Skytracker Pro, Move Shoot Move Tracker, Omegon Lightrack Mini, and the Vixen Polarie.
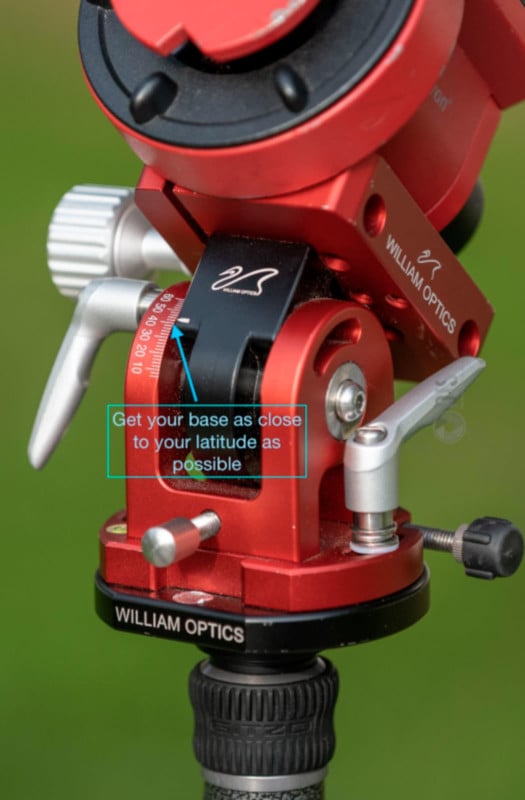
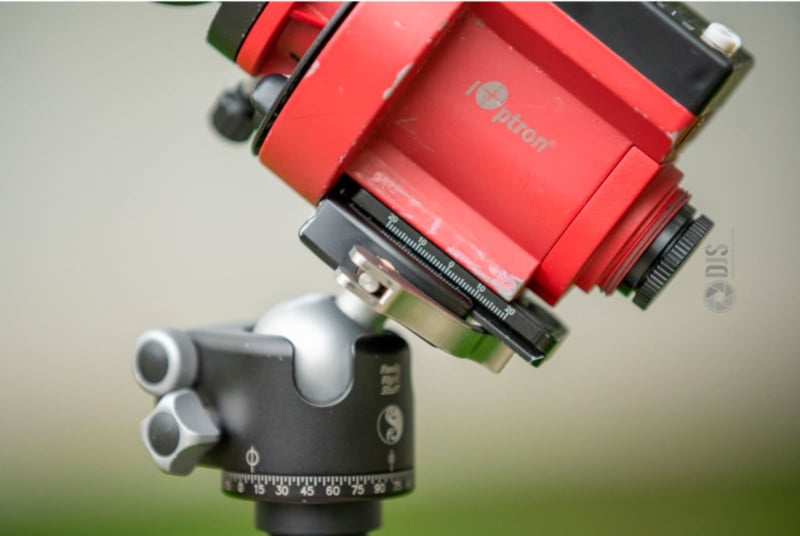
Another note: I highly recommend getting a tracker with an altitude-azimuth base or adding one in if the model you want does not come with one and you can afford it. This will make polar alignment a lot easier as they have latitude markings printed on the site and will always keep your tracker level so long as the tripod is level. If not, use what you have for now. It will still work.
The DIY Tracker Alternative
I feel this is the perfect time to throw into the mix here a fun little DIY project for those who want to get their hands a little “dirty” and also save some money. For about $30 in parts, you can build your own “barn door” tracker. This tracker gets its name as it uses two pieces of wood combined together with a tuned motor to mimic the same tracking motion as the manufactured options mentioned above.
Niko from Nebula Photos has an excellent video on how to build one, and I feel this is the type of project best demonstrated in a video. I recommend this option for someone who is on a tight budget but who wants to expand into more advanced astrophotography. I would not advise taking one of these on a hike however as they are much more fragile than a standard tracker.
How to Achieve Polar Alignment
This is the fun part! Now like I said earlier I am not going to focus on polar aligning your tracker specifically as all models differ in some small ways. Instead, I am going to give you a basic overview as well as tips and tricks to get any tracker setup and nail a Polar Alignment, which some would argue is the most difficult part of the setup. I will be using my tracker here, but use this guide as a basis for understanding how these things work and you can apply this knowledge to ANY tracker.
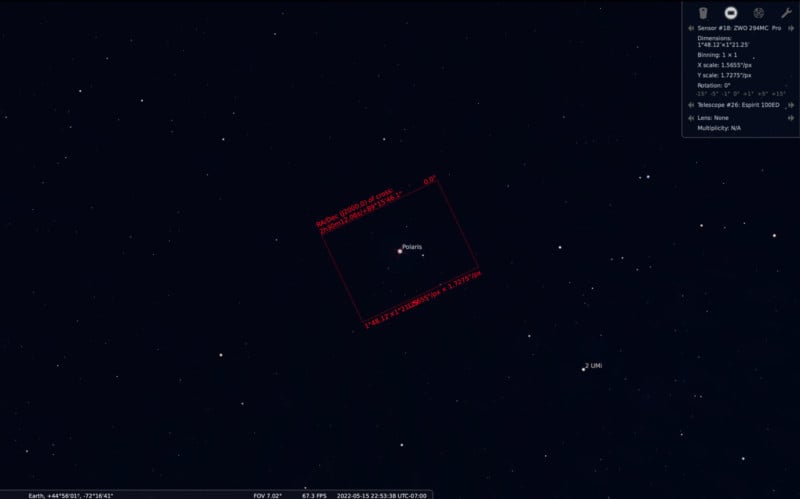
My best advice a few days prior to heading out to a dark site is to familiarize yourself with the night sky using Stellarium. Toy around in there with the stars in the night sky and how you can understand where to look to find either Polaris or the Southern Cross.
So how on Earth do I use one of these?
I highly recommend going through the steps during the day to get a feel for the controls of your tracker, as well as looking through your tracker’s polar scope if yours has one while moving the knobs on your alt-az base or ball head to see how the tracker moves. Understanding this movement will make it a lot easier to align everything when it goes dark.
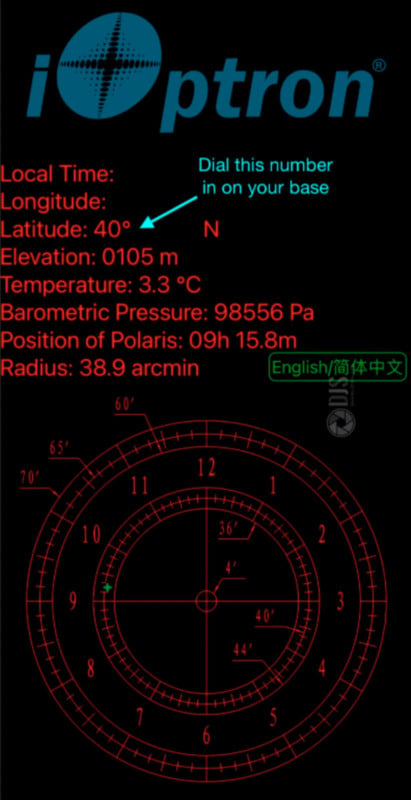
If your tracker has a polar scope instead of a laser, you will need to download a Polar Scope app. This will make it a lot easier to get a bang on polar alignment. The app will also display your latitude for dialing it into your alt-az base.
Locate the Pole Star
Find the pole star with the naked eye. Don’t lose sight of it.
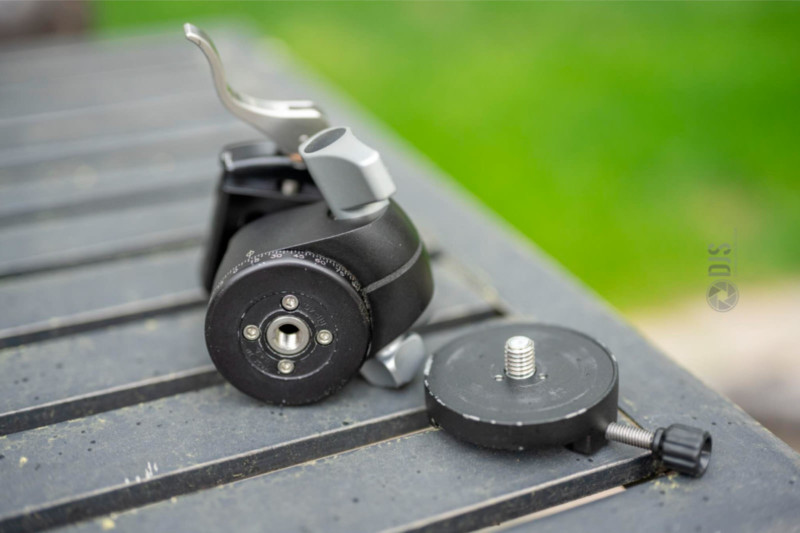
Grab your tripod, and open it up. If your tracker came with an alt-az alignment base, you will need to remove the tripod head. If you are using an additional ball head on your tracker and keeping the head on your tripod to align, you don’t need to do anything at this point.
Next, remove the head if required. This will expose the 3/8”-16 standard thread at the base. Nine times out of ten it will be this size, but if yours has a 1/4”-20 thread you can grab a 1/4”-20×3/8”-16 bushing for cheapies.
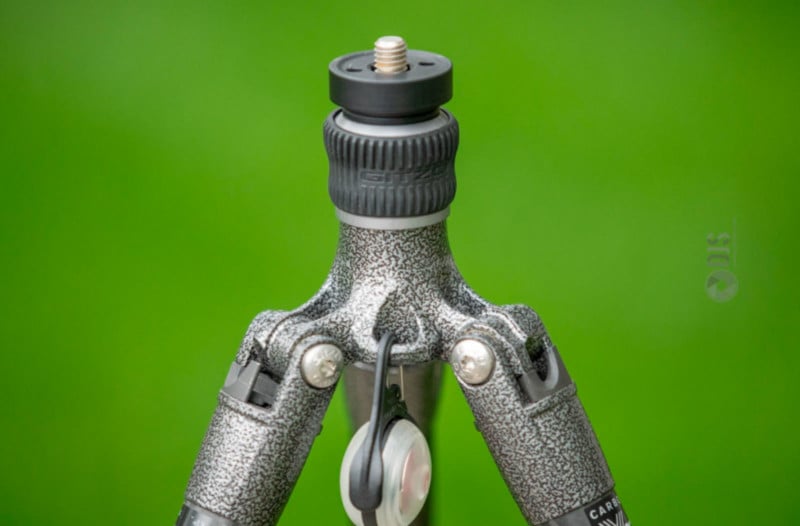
Screw on the alt-az base your tracker came with, or if you are using an additional ball head to align your tracker, attach your tracker to that head at this point. Reference the pictures below to illustrate the two ways to set these babies up.
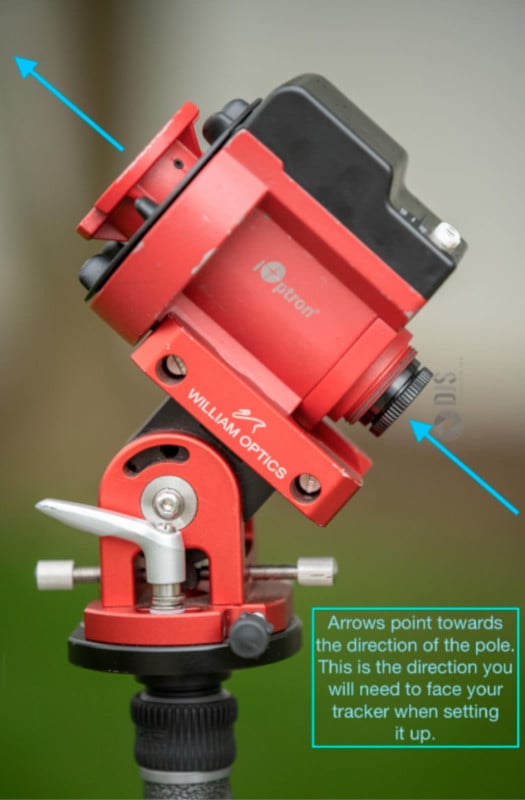
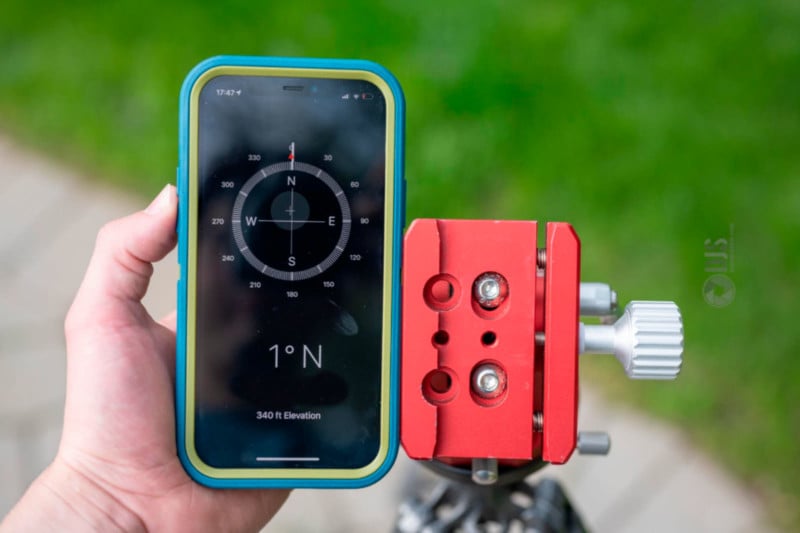
Next, and this is a little secret I love telling people to help out with a polar alignment: use the compass on your phone to roughly place the direction your polar scope looks towards when mounted on the tracker vaguely towards the Pole. Ok, that sounds like a mouth full. So, the tracker either uses a polar scope or a laser to align with the pole. Whichever direction your alignment tool looks towards, is the direction you want to have facing 0º. It does not need to be spot on at 0º, there are adjustments to correct this on final alignment.
Fire up your polar scope app and notice the number slapped next to the latitude reading. Use the altitude knobs on your alt-az base to dial this number in. This is already a great start to quickly finding the pole as now half the work is pretty much done.
Turn your tracker on. If your tracker has a polar scope, at this point it should be illuminated with the tracker in the on position. If you have a removable polar scope illuminator, attach that as well.
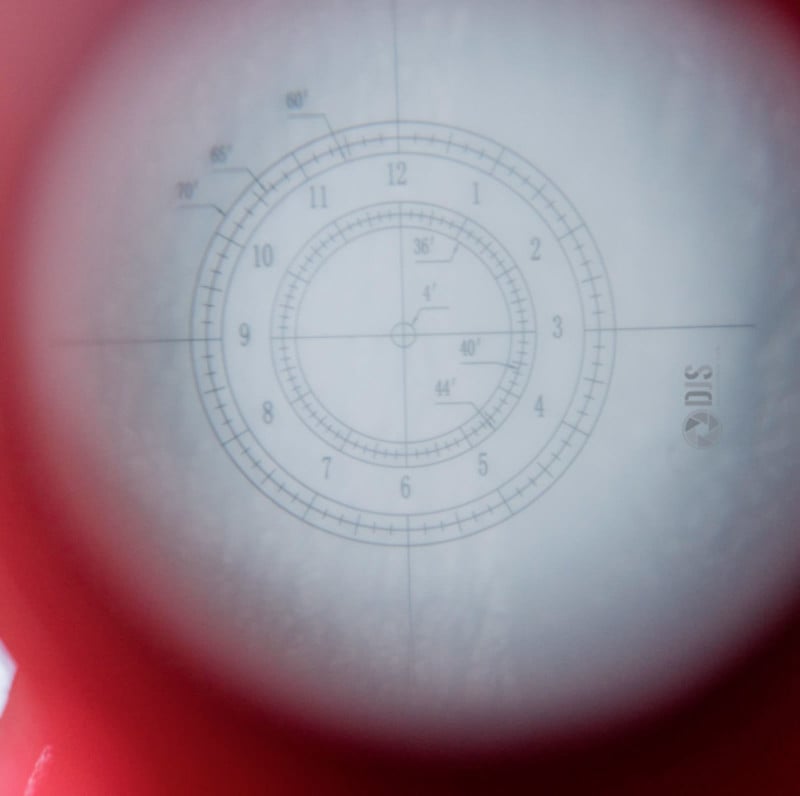
Look through the reticle of your polar scope. It may need to be rotated to a certain position for the red light to illuminate it. Note: some trackers have a detachable polar scope illuminator. At this point, you should attach it.
If your tracker has a laser instead of a polar scope, attach it.
Remember when you found the pole star in the earlier step? Now it is time to find it with your tracker.
Look through your polar scope or laser and simultaneously use the knobs on your alt-az base or ball head to move the entire tracker to the pole star. Once you can see the pole in your scope or the laser is pointing directly at it, you are nearly there.
At this point, laser-aligned trackers are pretty much good to go, but trackers with a polar scope are a little more precise and require a few extra steps.
Refer back to your polar scope app and find where the pole star is located for your given time and place. Use your adjustments on the alt-az base or ball head to get it as close to that location as possible.
Once complete, attach your ball head (or 2nd ball head) to your tracker’s bracket, then attach the bracket to the tracker.
Attach your camera to the ball head on the tracker. From now on, all movement of the camera will need to take place using the ball head. DO NOT MOVE THE TRACKER ITSELF. This will mess up your alignment and you will have to start all over again and that is no fun.
Pro tip: Rotate your ball head so the little notch faces directly up so you can easily correct for the angle of the tracker due to your alignment.
Time to shoot! Frame up some compositions, and use a remote or bulb timer to take a few minute exposures. The better your polar alignment is, the longer the exposures can be!
Combining Tracking and Stacking
Now that we know how to track and stack, you can combine them! This is where deep space starts to intertwine more with nightscape.
Using the techniques described above, you can combine stack sequences while tracking. This yields an even better result than just doing each one standalone.
When shooting deep space images, for instance, this technique is also critical. Now, this is the perfect transition into deep space.
How to Do Deep Space Astrophotography
Deep space astrophotography involves shooting photos of distant nebulae, stars, galaxies, and more.
Gear for Deep Space
Deep space astrophotography plays a major emphasis on getting lots and lots of data. This can mean spending many hours over multiple nights shooting the same target. Unlike objects such as the Milky Way core, most nebulae and galaxies are quite dim. This means in order to get the most out of each image you take, tracking becomes far more important than in nightscape. Although doable with stacking only if you are on a tight budget, the money best invested in deep space should prioritize accurate tracking. Without further adieu, let’s talk about what you need then:
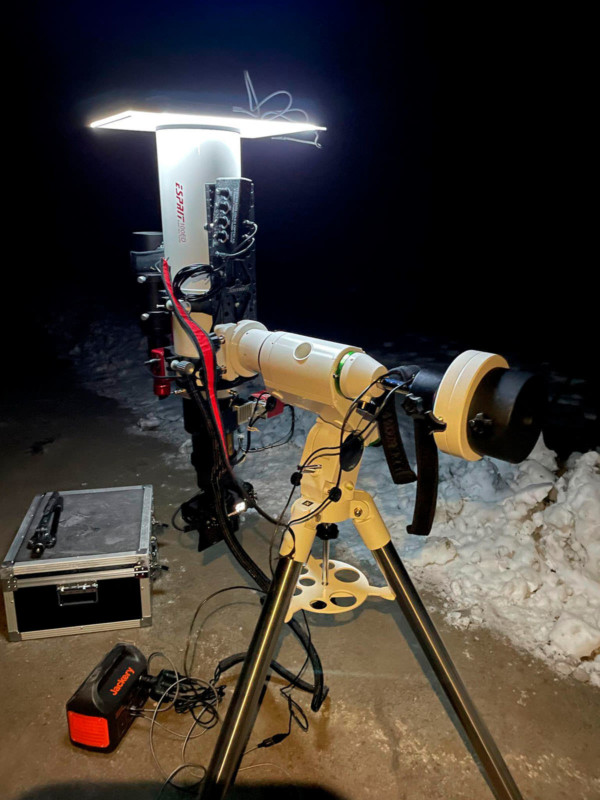
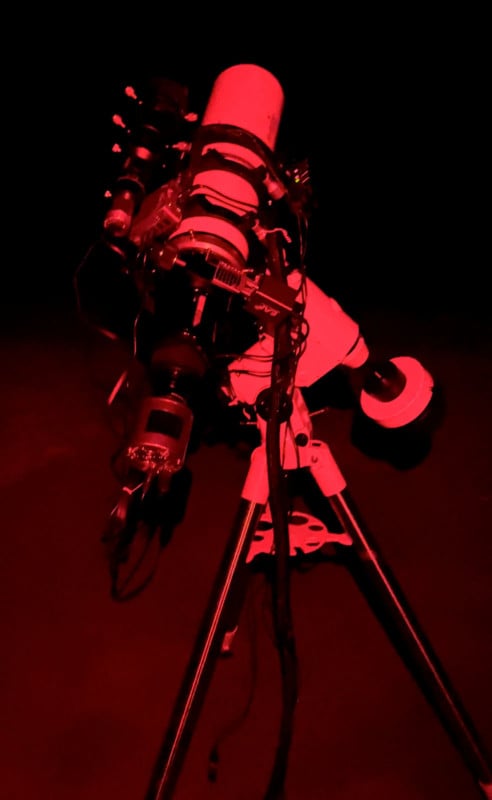
- A star tracker or full sized-equatorial mount. This is the most critical piece of the puzzle. You can start off with your star tracker if you have one, but down the road you may wish to jump to a full-sized equatorial mount. These mounts come in many forms, but all do one job very well. We will talk about the differences in the next section.
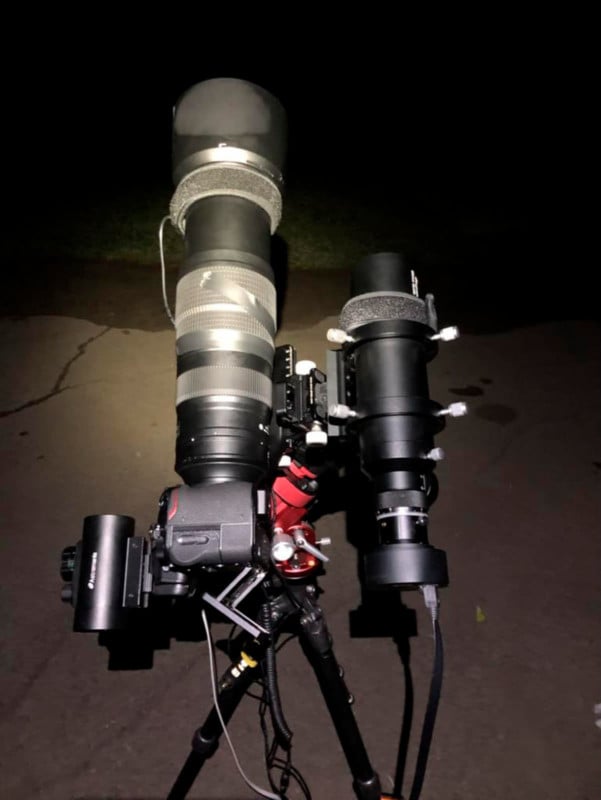
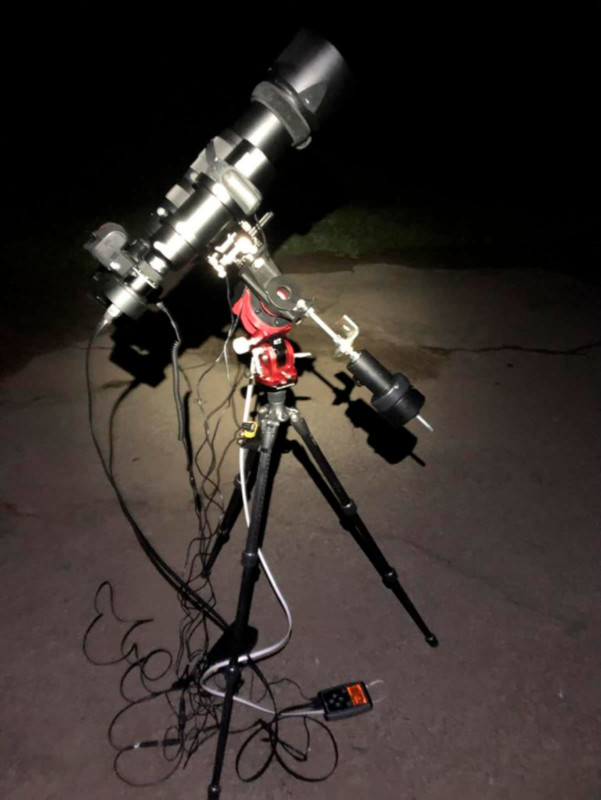
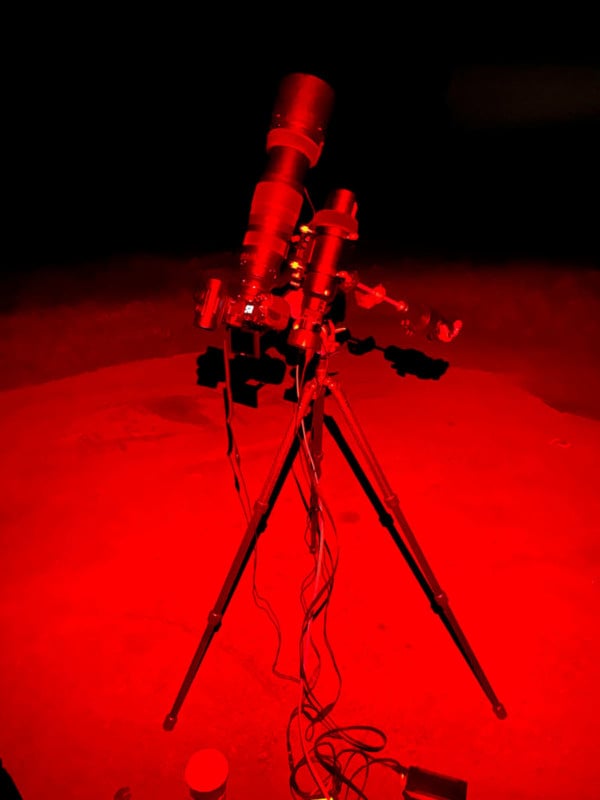
A star tracker setup with a guider piggybacked. - Any camera that can shoot manual exposure. A phone is not really going to cut it here, but if you already have a DSLR or mirrorless camera you have been using for nightscape, that will work great. Any sized sensor is fine, and in some cases APSC or Micro 4/3 sensors are more ideal than full frame.
- Stacking software. Whether free or paid, this is necessary for processing your files. We will talk about these options more further down.
- A telephoto lens or telescope. Now this is where the budget range can be very broad. Starting out with a telephoto camera lens is a great way to get your feet wet with deep space, but down the road you may wish to consider a telescope if and only if you have accurate tracking…
- A very sturdy tripod. This is now more critical than ever. We are talking about high focal length lenses or telescopes, so even the slightest wind can mess up your framing. The sturdier, the better.
- Guider. These devices, when coupled with a dedicated guide scope or off axis type, improve the tracking accuracy of your mount.
- An astronomy camera or astro-modified camera. These cameras are purpose built for astrophotography. They allow for more light sensitivity in certain wavelengths, and some feature cooling for optimal quantitative efficiency. You can also modify your existing camera to make it more sensitive to certain wavelengths. More on that below.
- Filters and filter wheels. These will aid in the blocking of light pollution. Yup, that is a thing! But, it is not as simple as it seems on the surface…
- An autofocuser. This is an accessory you can buy for your telescope to allow for automated control over focusing which is something that can be very tricky for deep space astrophotography.
- A red dot finder. These cheap little devices mount to the hot shoe bracket on your camera. This will be helpful in finding targets if you do not have an automated mount.
- A dew heater. As mentioned under nightscape, dew heaters become more critical in deep space. Having the front element of your lens fog up in the middle of the night while you are sleeping would be awful to wake up to the next morning!
Software and Apps for Deep Space
In addition to the few applications mentioned above, here is another list of some tools you will find helpful for both deep space planning, imaging, and processing:
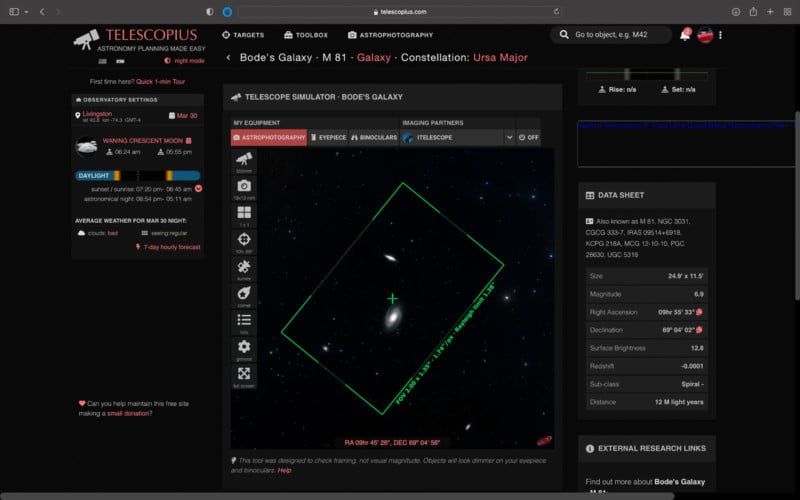
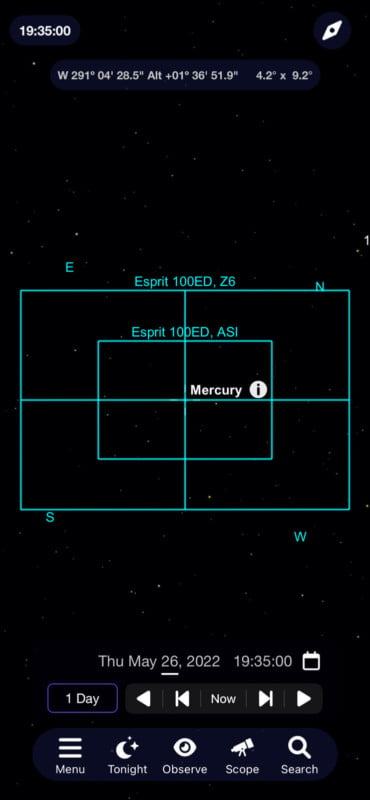
- Telescopius. This free web app allows you to plan your targets, inclusive of showing you a field of view for your particular camera + lens/telescope combo.
- Pixinsight. The ultimate deep space astrophotography processing software. Despite having a steep learning curve, Pixinsight is the goat. Works on all OSes and Apple Silicone.
- Siril. Another processing tool. Despite being free, this software is still fantastic and offers many powerful processing features. Works on all OSes and Apple Silicone.
- Deep Sky Stacker. This is a free windows only application that can stack your images. It is not as powerful and effective as stacking in Pixinsight, but it gets the job done.
- Starry Sky Stacker. Consider this the Mac version of Deep Sky Stacker. Although paid, this program works quite well especially if you are not quite ready to jump to Pixinsight yet.
- Sky Safari. Similar to Stellarium, this mobile app lets you access the night sky and an extensive database all on your phone. This is great for when you are out in the field. Works on iOS and Android.
- Polar Scope Align Pro. This paid app allows you to perfectly polar align your star tracker. Works on iOS and Android.
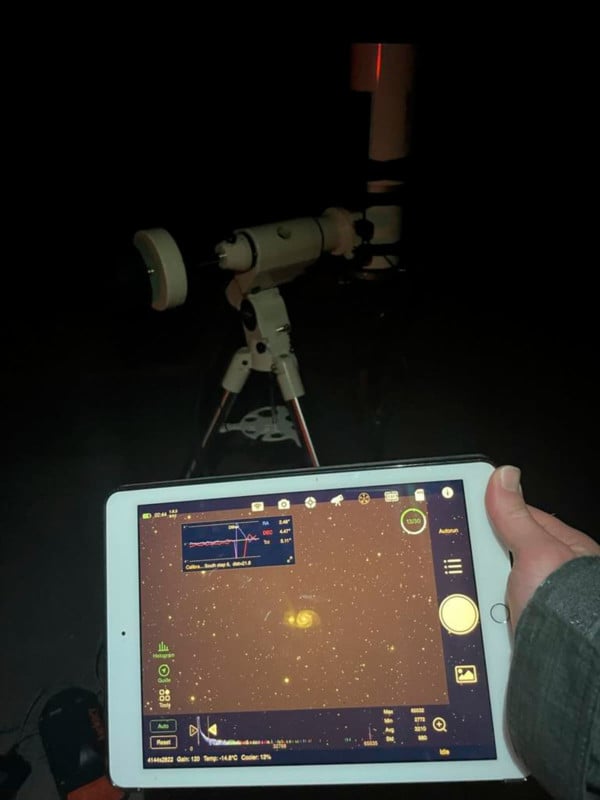
- A laptop, computer, or Mini-PC running dedicated astrophotography image capture software such as N.I.N.A, APT Tool, or an Astroberry or ZWO ASI Air pro.
- ASCOM Drivers. Necessary for communication between your hardware and computer.
- PHD2. This is strictly for controlling your guide camera to ensure proper guiding with your mount.
- Sharpcap. This software will plate solve which ensures spot on accurate polar alignment for computer controlled mounts.
Planning for Deep Space
Like with nightscapes, you still need clear skies, use the weather app tools above to plan for that. You also need to figure out what you want to shoot. Certain targets only appear in the sky during certain times of the year.
For example, the Orion nebula is considered a winter sky target here in the Northern Hemisphere. It cannot be seen in the summer. Likewise, the Lagoon nebula can only be seen in the summer, but not in the winter.
Use Telescopius, Stellarium, and Sky Safari to determine what you want to shoot and well. Plug your camera and lens/telescope into these tools to figure out how big the targets you want to shoot will be with your setup, what time they rise/set and cross the meridian, as well as if the Moon will interfere with your imaging session.
Note: Try not to shoot your target as it gets too low on horizon. This is where the atmosphere is thickest and the light pollution is strongest, therefore giving you potentially bad data.
Fun fact: deep space objects are actually HUGE! They are just too dim to actually see with the naked eye which is why we use cameras to photograph them. You may be surprised to find out just how many targets you can capture even at something like 200mm.
At this point, things will change depending on the level of gear and automation you have. Light pollution is still a huge issue, but we will discuss it on a use-case basis. Now, let’s break down deep space from least complex to most complex.
Calibration Frames in Deep Space Astrophotography
This is really, really important. Calibration frames are CRITICAL to deep space astrophotography. There are a few types you need to know about. If you are not shooting your calibration frames and processing as such, you are doing a disservice to your data!
- Flats. Perhaps the most important. These are taken at the end of an imaging sequence, or before changing filters. You can shoot these with some sort of diffused light panel, or against the dawn sky. These will eliminate any dust motes on your OTA (optical tube assembly) or sensor as well as correct for vignetting. DSLR/mirrorless shooting RAW for nightscape can easily get by with the built-in lens correction profiles, but those will not be as accurate as doing flats, and will not fix dust motes.
- Bias. There are always electronic circuits running through your sensor. But oftentimes those electronics can leave behind weird noise or patterns such as banding. Bias removes these by shooting with the fastest possible shutter speed and lens cap on.
- Darks. This is another one that some DSLR/mirrorless cameras have as a built-in function, but might not be advantageous to use. Doing darks separately will allow for better tracking and more efficient time in the field. These are also done at the end of an imaging session. The goal is to eliminate any hot pixel noise created by the sensor heating up during exposure. Shoot these with the lens cap on and the same duration shutter speed as your lights.
Shoot flats after each target, and shoot darks at the end of the night. Bias only needs to be shot once. Cooled astro cameras can also build a darks library as the temperature of these sensors is regulated.
Cameras for Deep Space
When first starting out in deep space, any DSLR or mirrorless camera will work as mentioned above. But, deep space also offers a slew of options for those wishing to expand their practice.
The first thing you can do is modify your camera. You can either do it yourself if you are comfortable or send it out to a professional such as Lifepixel (no affiliation). Modifying allows you to capture more faint nebulosity, in particular within the Hydrogen Alpha (Ha) wavelength. This is the bright red color often found within emission nebulae such as Orion, Rosette, California, and more. This type of modification is not very effective with broadband targets however such as galaxies like Andromeda. You will need to do some research to see if the camera you have is capable of being modified. Some bodies, mainly Sony’s, tend to have issues after modding where they leak light onto the sensor due to a weird infrared monitor built into the sensor.
Typically a mod will allow for up to 4x sensitivity within the Ha regions. The downside is once you commit to a mod, daytime photography will be difficult. This is because the mod is physically removing filters in front of the sensor, which prevents the Ha light from being registered on the sensor, to begin with. Most folks who mod tend to sacrifice an older, cheaper camera body just for astrophotography, and have a separate one for daytime. The most common cheap and effective mods are on Canon T3s and Nikon D5300s. Don’t let the age of the body fool you, these are great cameras for deep space even today, and I have seen already modified variants of them on used forums for less than $350.
Further down the road, you may want to consider a dedicated astrophotography camera. This is totally different than any other standard camera. There is no back LCD, controls, or even a battery. Basically, these are little cylinders with a sensor chip on them. Everything is plugged directly into a computer and controlled from there. These are strictly tools for astrophotography only.
Many of these cameras even have active cooling too, which helps to eliminate noise when imaging for such long exposures. They come in most common sensor sizes from Micro 4/3 to 35mm full frame. They can either be CMOS or CCD sensors, but most are CMOS these days.
My advice, if you really enjoy deep space, is to get a modified camera or modify one of your own. Then consider going with a dedicated astro camera. This way you do not have to spend money and learn so much new gear all at once. Ease it in.
More Than Meets the Eye with Deep Space Cameras
In addition to cooling, deep space cameras have another trick up their sleeve. You can buy one of these puppies with either a monochrome or full-color sensor (one-shot color, or OSC for short).
You might be thinking, why on Earth would you buy a camera that is monochrome? It just seems counterproductive. Well, as discussed below under the narrowband vs. broadband section it will become a lot clearer. For now, what you need to know is that for purchasing your first dedicated astro cam, it is best to buy an OSC model which will feel as close to shooting with a DSLR or mirrorless camera as possible.
Shooting Untracked Deep Space Photos
Like nightscape, we are going to start out as basic as possible. Say all you have is a camera, lens, and tripod. No tracker. What is the best possible thing to do at this point? Welp, that would be to buy a full tank of gas and drive out to a dark sky. Use the light pollution map referenced above to find such a place, and of course make sure to time your outing with clear weather.
Shooting untracked does not require software automation with a computer or guiding. What it does require, however, is patience and an empty memory card.
Setup
- Get your camera setup and fire up Sky Safari or Stellarium to determine where your target is.
- If you have it, place your red dot finder on your camera hot shoe.
- Star hop to your target by matching the stars on Sky Safari with the stars you see in real life. This technique is easier with a red dot finder as you can do everything visually.
- Once you feel you have centered your target, zoom in your camera lens and use live view to focus manually.
- Set your color balance to daylight, as that is true to the natural sky color.
- Plug in a remote if you have one. If not, use the self-timer mode on your camera.
- Use the NPF rule to calculate your shutter speed. Don’t be surprised if you are getting very small, <1 second, shutter speeds due to the longer focal length.
- Use a high enough ISO so your target can clearly be seen on the playback. This may even be upwards of 12800 or even 25600.
- Shoot your target. Shoot as many frames as you can. Be careful though! You want to keep your target centered. This will require you to constantly move your camera left/right and up/down. The target will move quickly because the Earth is rotating so quickly relative to your focal length. Try not to let your target drift too far to the edges of the frame.
- Go for as long as you can or until your arms get tired.
Once you are done shooting your target, you are ready to stack your frames.
Add a Tracker
Now that we know shooting untracked deep space astrophotography is kind of a pain in the butt, we are ready to discuss the magic of adding a tracker in.
You don’t even need a full-sized EQ yet. Just something light and portable to take all this fidgeting out of the mix. Reference the choosing a tracker nightscape section.
Repeat the steps above for finding a target you want to shoot. Set your tracker up in the field in a dark sky and balance your tracker using the included declination bracket and counterweight kit.
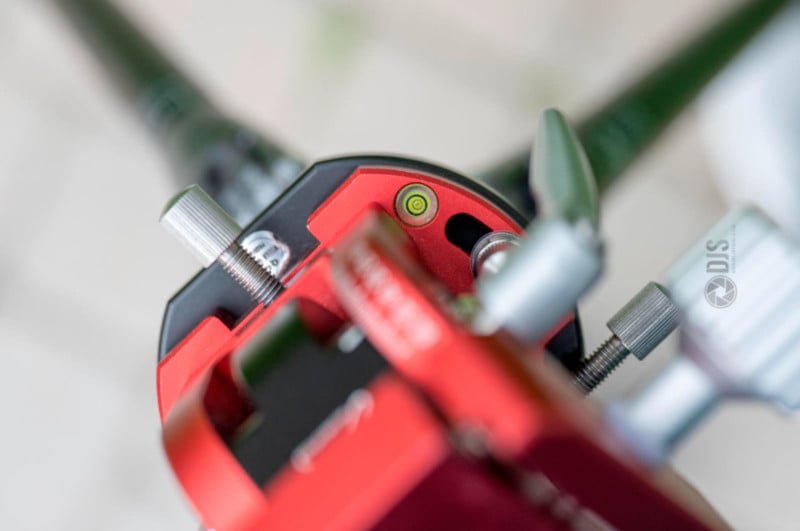
How accurate your star tracker is will be determined by a few things, chief among which is your polar alignment. Use PS Align Pro to ensure you are as spot-on as can be. Also, ensure your tracker is level and the tracker is balanced with sufficient counterweights. When you balance, it is important to keep the weight ever so slightly East heavy to ensure the tracker clutch stays engaged.
You will still need to star hop to a target as a portable tracker is not automated to find targets for you. Star hopping with a tracker is a bit different than using a ball head. Equatorial trackers have two axes, the right ascension and declination. They move in a kind of awkward way, but you will get used to this in practice. Unlike nightscape tracking, do not use a ball head or any other type of head on your tracker for deep space as that will interfere with its balance.
Ensure your lens is focused and your target is centered by taking a few test exposures.
Now, this is where the magic begins. Start by taking a 30-60 second exposure depending on your focal length. See if the stars are trailing. If they are, lower it down. If not, you can bump it up a bit. Even so, it is still pretty amazing to take such a long exposure at such a high focal length with no trails!
Shoot for as long as you can. Now that you are tracking, it is nearly impossible to get too much data.
If your target starts to get too low on the horizon, switch to a new one you may have planned for the night.
Barn door tracker folks: it is important to note that YOU CAN use one for deep space. Remember, any tracker is better than no tracker, so it is worth a shot. The same steps still apply here. You may be surprised at just how well it can do!
Now, having a star tracker is great. For most, this is plenty without needing to reinvent the wheel. In fact, half of the tools mentioned above were not even used for deep space with just a tracker. This is about to change, things are going to get much more intricate.
Equatorial Mounts, Automation, and More!
Now we are getting much deeper into the mix here (pun very intended). So, you have outgrown the capabilities of a portable tracker, and are really enjoying deep space. You have a budget of about $1,000+ to sink into the hobby and are ready to take the next steps.
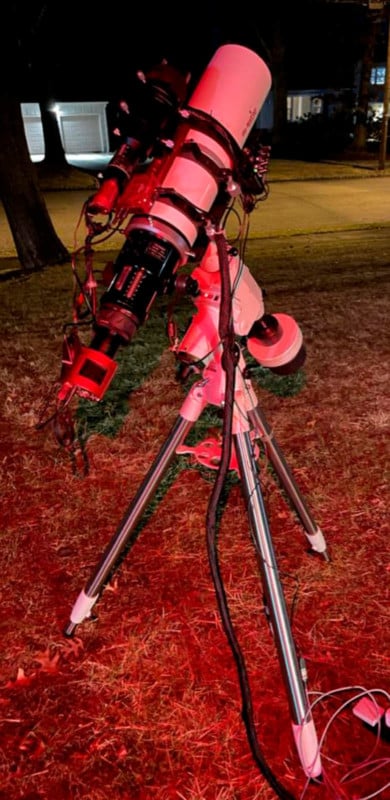
Let me introduce you then to full-sized equatorial mounts. This is what the pros use to image. They range in price and capability, but all do one thing very well: track the sky. You want to purchase one that is capable of computer software control, and you also want to futureproof it for when you grow the hobby for years to come. With so much complexity at this point, computer control is pretty much necessary to avoid headaches and automate your setup.
Quick note: I am referring to equatorial mounts, not altitude-azimuth or GPS computerized mounts. Only the equatorial mount is suitable for astrophotography because of its design. These other types of mounts may be tempting because they are cheaper or easier to use, but they will not be able to effectively track the sky.
Here are some brands of mounts:
- Sky Watcher. The HEQ5 & HEQ6r Pro’s are among the favorites, I personally have the HEQ5.
- Orion. Either the Atlas or Sirius mount, they are actually equal to the HEQ5/6.
- iOptron. The CEM mounts are fantastic.
- Losmandy
- Celestron. Folks swear by the CGX, but avoid the AVX as it is troublesome.
Okay, so now you have purchased your mount, where does the automation kick in? Well, this is where the computer is going to come into the mix. You will need to download software like NINA and any sort of ASCOM drivers that work with your mount. Because there are so many variables with gear here, this guide is not going to discuss each one further in-depth. Instead, as is the theme here, we will go over a broad description of each.
Unfortunately, this is where having a Mac computer can be difficult. Most capture software is widely supported on windows. As a Mac user, the workaround with this is to either try running Windows as a virtual machine on your Mac or using an alternative method such as the Astroberry or ZWO Asi Air Pro. I am a Mac user and have gone the ZWO Asi Air route.
- Astro Photography Tool. APT for short. This program connects to most mounts, cameras, filter wheels, and offers capture automation for all of the above.
- Nighttime Imaging ‘N’ Astronomy. NINA for short. Similar to APT, but a few steps above. This software allows for even more sophisticated control of your rig including automation of mosaics, meridian flips, filter focusing and more.
- BackyardEOS, BackyardNikon. These softwares are a bridge between using your camera controls and a program like NINA. I would recommend making the full jump to NINA or APT if you can though, but they need to be mentioned.
- PHD2. As mentioned above, this software is required for guiding. Guiding is necessary to correct for periodic errors in your mount as well as alignment errors. Without guiding, taking 3-5-10 minute exposures may not be possible.
- Sharpcap. Again as mentioned above, this program uses a technique called plate solving to figure out which stars the mount is pointed out. NINA and APT use this technique as well to ensure your targets are centered, but Sharpcap only uses it to figure out how accurate your polar alignment is. It will then tell you what controls to move to make your mount as aligned as possible.
- ASCOM. These free drivers piece all of the above together. Without these drivers, none of your equipment would ever be able to communicate.
Capture Alternatives
Getting together all of these software is complicated, but it allows for the ultimate control of your setup with almost no restrictions on gear. Below are a few much more simplified alternatives to the above, albeit at the expense of compatibility.
- Astroberry. This software needs to run on a Raspberry Pi and requires some tinkering to set up. This is a great alternative for those comfortable working with Raspberry Pis. You will need to build the Astroberry and flash the firmware. It connects wirelessly to any device using VNC for control.
- ZWO ASI Air. For all intents and purposes, this is a Raspberry Pi running ZWO’s proprietary software which can make your life super simple or feel a little complicated. It too connects wirelessly to any smartphone or tablet and runs off of the native ASI Air app.
I personally have gone the route of the ASIAIR, but there are a few pros and cons to this. The pro, as said above, is that this device is practically plug-and-play. There is no DIY involved at all really. The cons are the device is severely limited in 3rd party support. While the type of equatorial mounts supported is extensive, ZWO has closed down the software to only support its own line of filter wheels, electronic focusers, and astro-specific cameras. While Nikon and Canon cameras are supported, a competitor’s dedicated astro cam such as one from QHY will not work. Sony cameras are also not supported. If you go this route, you are pretty much locked into the ZWO ecosystem. This can feel very frustrating, especially when in some cases the alternative product may suit your needs better.
Optics/Telescopes
Now that you have your camera situation sorted out, it is important to discuss the next most critical piece of the puzzle here, your optical tube assembly (OTA)!
You can start off basic here with just a camera lens, but down the road you may wish to consider a telescope of some sort. Don’t be intimidated! There are loads of cheap ones for deep space. Consider old used vintage lenses. Takumar glass seems to be a fan favorite that perform well on the cheap. Other alternatives are lenses from Rokinon/Samyang. These cheap manual-focus-only lenses perform relatively well for astro.
Once you get your deep wet, down the road you may wish to consider a telescope such as a Refractor, Schmidt Cassegrain, or Newtonian. All have their pros and cons from price to usability. I personally prefer refractors, but they are the most expensive, heavy, and might not offer enough focal length for the types of targets you may wish to shoot. Newtonians offer longer focal lengths for less money, but they require precision culmination to keep the optics centered.
Broadband vs Narrowband Imaging
Now we come to broadband versus narrowband imaging. What is it and what are the differences? This about to get super nerdy — my specialty! As briefly discussed above when mentioning modified cameras, deep space targets have particular wavelengths of which they emit light. Many nebulae for example can be found in predominantly the Hydrogen Alpha (656 nanometers), Sulfur II (672 nanometers), and Oxygen III (500 nanometers) spectrums. There is also Hydrogen Beta (486 nm) and Nitrogen II (658 nm) which are much fainter but still worth noting.
What if I told you there is some sort of way we can isolate these wavelengths to only show the nebula and nothing else? Yes, even eliminating light pollution along the way?
Well, that is where narrowband imaging comes in. This is the key to shooting right from your backyard. These filters come in two common sizes, 1.25” and 2”, and in some cases a clip-in type for DSLR or mirrorless. Essentially, these filters will pass through one, two (duoband), or even three (tri-band/triad) very specific wavelengths which correspond to what was mentioned above. This means that anything outside of those spectrums will be eliminated.
So cool, right? Well, this is of course not without limitations. Because the bandpasses are so narrow (hence narrowband), exposure times will need to be very long, like very very long. 5-10 minute exposures imaged over the course of several nights are not uncommon for narrowband. Many folks will put in 20-30-40+ hours of imaging just for one target.
This is also where having a monochrome makes a huge difference. By going mono, you are maximizing the efficiency of your narrowband filter. Let me explain… (Yes, it gets even nerdier…)
The Color Filter Array
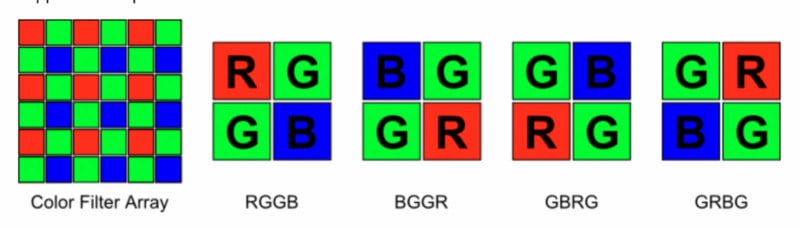
Color cameras need to absorb red, green, and blue pixels all at once. This means each individual pixel is devoted to one color. Take a 2×2 square of pixels. 2 on the top, 2 on the bottom. Well, with only 3 colors, that means one color needs to repeat. In most sensors, that color is green. So from top left to bottom right, a sensor’s pixels would read red, green, green, and blue.
This grouping is known as the color filter array, and it means that a color camera can only partially utilize a narrowband filter. If, for example, you have a hydrogen-alpha filter in front of the sensor that is only letting pixels within that 656nm red spectrum, only the red pixels are absorbing light. This means only 25% efficiency on the sensor.
But, if you have a monochrome sensor instead, 100% of the pixels are being utilized as there is only one type of pixel. Most cameras have an array of RGGB, which is more commonly referred to as the Bayer Matrix. Fuji X-Trans cameras work a little differently as do some astro-cams.
Back to Narrowband
So to put this all back together, what you have here is a big decision to make, but it is one that is made further down the line in my opinion. To go mono and get a specific filter for each spectrum, or go OSC and get by with something like a duo or tri-band filter?
Well again, in my opinion, start with color. While not as efficient as mono it is much less time-consuming, much cheaper, and much easier to learn. Down the road, as you master narrowband with an OSC, the jump to mono will be far more seamless.
OSC with narrowband filters even in light-polluted areas will yield great results. Oh yeah and I almost forgot one more thing: the full Moon. Yup, narrowband will block light from that too! Just ensure your target is not too close to the Moon or else you will get some weird flaring.
Broadband: Why It Still Matters
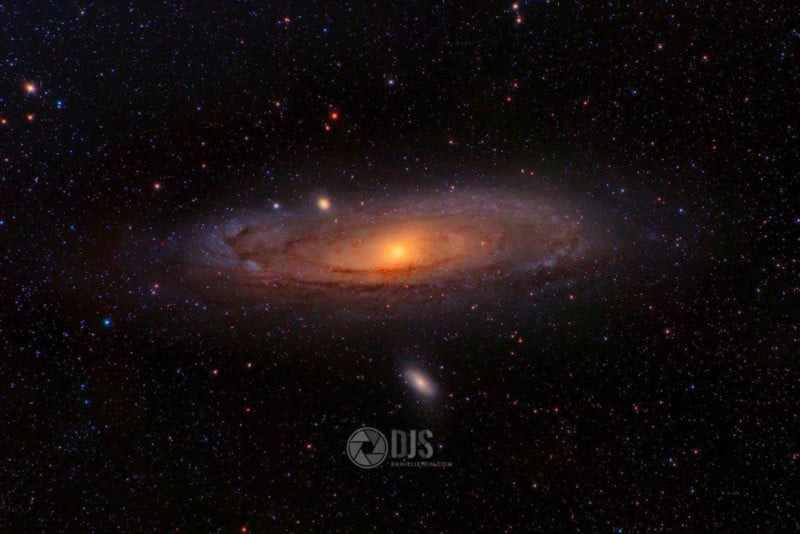
Not all targets are going to work with narrowband filters. One of the best examples is the Andromeda galaxy. While our sister galaxy certainly has a fair amount of h-alpha in its surrounding spirals, it is not the primary makeup. In fact, a standard DSLR or camera can shoot such a target just fine.
When we throw light pollution into the mix, however, this complicates things. Mono cameras can take advantage of using broadband red, green, and blue filters to assist with capturing light, and OSC cameras will just need a simple UV/IR cut filter to reduce star bloating. But, because there is not much blocking light pollution, you will need a lot of data. The more the better, as separating the light pollution from such a dim target reveals noise, and that noise needs to be stacked to be cleaned up. The more data, the more to stack.
Filter Wheels
So with all of this talk about filters, you may be wondering how to keep track of all this? Well, for starting out a simple filter tray with 1, 2, or even 3 filters is fine. Just be sure to shoot flat frames before swapping each one out.
But, when you go full mono or are just feeling like you could use the automation, in comes the filter wheel. These can range from holding 5-8 filters. Any brand will work if you are using software like NINA to control, but if you have an ASI Air you must use the model from ZWO.
These will require some configuration to set up, but once done you can really automate your nights by shooting for X frames on a certain filter before swapping to the next. Again, flats are still important to shoot for each filter before switching to the next.
Electronic Focusers
This is the final stage in the process here of fully automating your setup. Yup, you can buy a little doohicky that will control the focus of your telescope. Now keep in mind I said telescope. This device will not work with a camera lens. Such focusers are controllable via software like NINA or ASI Air if you have a ZWO focuser.
These software programs have built-in programs to calculate the best focus for your scope so you don’t have to. If you are using filters, this is especially helpful as different filters will change your focus.
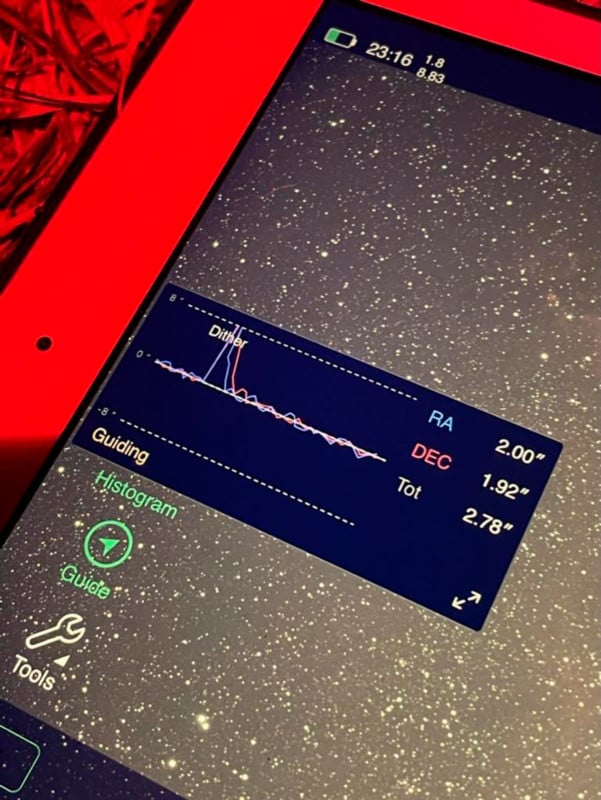
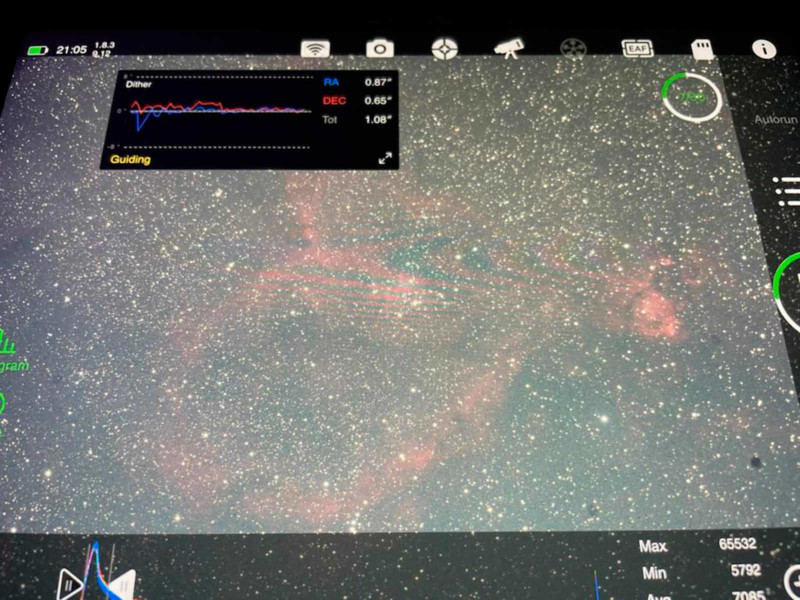
Dither or Die
Sounds harsh, but this age-old phrase is still applicable in modern-day astrophotography. When shooting a stack with a tracker, for instance, the object should stay in relatively the same spot over the course of the imaging session. This is great for alignment purposes, but not great for something called walking noise.
See, the pattern of noise is not always as random as you think. When overlaid across several exposures it forms a weird artifact. Almost looking like a wave of noise, this is called walking noise. So, how do you fix it? Easy, you dither.
This technique is simple. You move your rig ever so slightly in between exposures. This ensures the noise is randomized across your exposures and thus the stacking software should eliminate it entirely. Fully automated rigs can set a parameter to dither X pixels every X exposure, and when shooting untracked you are effectively dithering considering the target is in a slightly different spot in each frame. But, when shooting with a basic star tracker, you will want to dither manually by moving the RA and DEC axis manually ever so slightly in between 4 shots or so.
Shooting Automated Deep Space Photos
So, as you can see, deep space astrophotography places a much larger emphasis on gear than nightscape astrophotography. In my opinion, deep space is more where science meets art, and nightscape is more where art meets science.
There are just so many little factors with gear that trying to handle everything manually is going to be difficult and frustrating. That is why capture software exists. The goal is to be able to have one centralized computer or alternative to automate things.
Once you have successfully planned a target you want to shoot, have a clear night, and determine whether or not you want to shoot narrowband (which can determine if moon phase is relevant) then you can begin to set things up.
A deep space session might look something like this:
- Set your mount up in a location with a good chunk of clear sky overhead. For some, this may be your backyard.
- Build your rig by putting all of your components together. Camera, OTA, filters and wheel, focuser, guide camera and scope, and of course your computer.
- Ensure your mount is balanced on both the declination and right ascension axis.
- Power on your rig. Plug in your computer and ensure all drivers are installed if required. This step is where having an ASI Air is nice. Generally speaking, it is plug-and-play, but if you go the route of NINA, you may be spending hours here getting all of your gear to communicate with your computer.
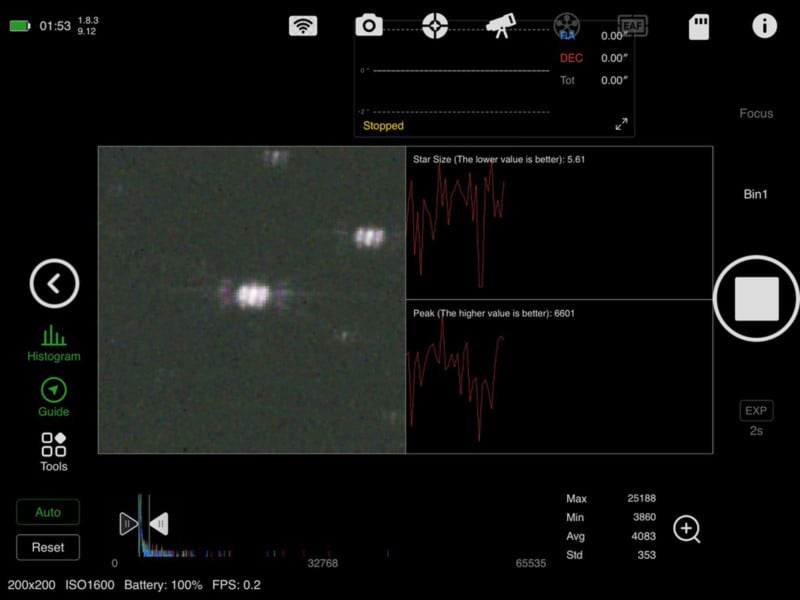
- Vaguely focus your OTA either manually or with an autofocuser.
- Use Sharpcap to polar align your rig.
- Point your rig towards the target you want to shoot via your software. The software will plate solve for you.
- Fine tune your focus, and focus your guidecam/scope as well.
- Initiate guiding using PHD2.
- Program your software to shoot for X frames at X exposure.
- Let the sequence software work its magic. Ensure all of your cables are neat should your rig need to do a meridian flip.
- Go to sleep and let the automation work its magic!
- Shoot flats at the end of your sequence.
- If shooting with a DSLR or mirrorless, shoot darks at the end of your sequence.
- Otherwise, cooled cameras can build a dark library whenever since they are temperature regulated.
- Shut down your rig the next morning, load your files onto drives, and backup.
- Next clear night, repeat!
How to Do Planetary/SSO Astrophotography
With deep space behind us, it is optimal to tune our attention to planetary and other solar system objects (SSO) at this point. Like deep space, you will ideally want to shoot with automated software control, but the gear and techniques are slightly different. Of course, given this is an all-inclusive guide we will walk through the steps on how to do so without any mount.
It is worth noting that you need clear skies and optimal seeing for planetary shooting. Seeing is a term referred to the amount of stillness in the air. It is not really naked eye visible, but when using a telescope with such a long focal length, it can quickly make shooting difficult. Fortunately, Astropheric has this statistic built right in.
You also do not need to worry about light pollution. SSOs are extremely bright as they are illuminated by our sun. As such, larger aperture telescopes and light pollution just do not matter.
Software and Hardware for Planetary/SSO
You do want a long focal length, however. Unlike DSOs, planets are REALLY small in our night sky. This means that shooting with focal lengths of 2000mm+ is fairly common, whereas in DSO you would shoot much wider most of the time. But, because planets are so bright, you do not need a fast aperture scope or larger sensor camera. You also do not need cooling as you will be using a shutter speed much too quick for sensor dark current to be an issue.
This leads me to my next point: planetary cameras. Typically these cameras have smaller sensors that specialize in high frame rate “video” for capture. The smaller sensor means a smaller field of view by the crop factor, and a high frame rate refers to the use of video for capture. Using video at a high frame rate video and only extracting the good frames from it is called lucky imaging.
Think of lucky imaging like stacking. If your camera is shooting at 120FPS, that means that a certain percentage of those frames are going to be good or bad data. The bad data is chucked away during stacking, and the good data is utilized. You can shoot at such a high frame rate because the planet is so bright like I have said, but in order to do so, shutter speeds need to be quick. This means to compensate for noise and detail due to lack of light you need to shoot A LOT of frames. Thousands, many many thousands.
Tracking is very helpful for SSO imaging as well, as like I said you are using a high focal length scope which further emphasizes the need for accuracy.
As with deep space and nightscape, it is possible to image planets without tracking, you will just be moving your rig A LOT. You can use ANY camera with a video mode to shoot planetary. Just don’t be surprised if even Jupiter looks TINY even with a 500mm lens.
Processing software is also going to be slightly different as well. Because we will be extracting still frames from video to stack, the best software programs for this are going to be the following:
- Registax. Free for Windows and Linux.
- PIPP. Free for all platforms, but Mac & Linux must run via Wine.
- Autostakkert. Free for Windows only.
- Lynkeos. Free for Mac only.
- Siril. This would be my choice. Free for all platforms and also has assistance for capture automation.
Planning for Planetary/SSO
Much like DSO, use Stellarium to figure out when the object you want to shoot will be viable. Of course, use Astrospheric and other weather apps to determine if the skies will be clear. Telescopious does not have planetary planning built in, but Sky Safari Pro and Stellarium will certainly do the trick here.
Really, that is it! Just clear skies and a nice still atmosphere. Light pollution and moon phase do not matter as SSOs are so bright
Shooting Planetary/SSO with Camera and Tripod Only
- Use the longest focal length lens you have.
- Switch the camera into video mode. Change the settings to allow for the highest FPS possible but without sacrificing too much quality. For example, 1080p, 120FPS.
- Rotate your camera to your target and focus.
- Center your target and start recording. You will see these things are going to move FAST.
- When the target gets to the last 3rd of your frame, it’s time to stop recording, re-center, and then start again.
- Pro tip: use Stellarium or Sky Safari to determine the direction of travel for your target. That way, you can place it in a good starting point of your frame to better utilize the entire length of the video.
- Once you feel you have taken some good data, that’s it! Remember, the more the better.
Shooting Planetary/SSO with a Star Tracker
Like with a camera and tripod setup, you will still want to use the same video mode. But, trackers allow for a little less “manual labor”
Some trackers have a Planet mode. You will absolutely want to use this. This is because solar system objects move at a different speed relative to the Earth’s sidereal speed.
- Align your tracker with your celestial pole. Used the methods discussed above to do so.
- Find your target, use Stellarium or Sky Safari for assistance.
- Shoot!
- Depending on the focal length of your lens, you may need to re-center the target every now and then due to the tracker slipping ever so slightly.
Shooting Planetary/SSO with a Fully-Automated Setup
Just like DSO, a fully automated planetary setup will allow you to rest easy and collect as much data as possible, all the while allowing for the expansion of bigger scopes and different cameras along the way. But, it does come at the cost of more complexity to set up, just like DSO.
- Align your mount using Sharpcap. You want a spot on alignment for these crazy long focal lengths.
- Point your scope to your target using the software of your choosing.
- Shoot!
- You can really let this one rip.
Some Cool Stuff to Consider
- The International Space Station, or ISS for short, is also a fun target to shoot. Try to capture it in front of the Moon as a transit!
- Certain planets have phases just like the Moon! Take a look at some cool pics of the crescent of Venus.
- You can also capture the rotation of planets as a timelapse.
How to Do Solar/Lunar Astrophotography
This category is interesting. It is kind of a hybrid of methods used between DSO and SSO. So, let’s talk about them.
Because the Sun is so bright (obviously) and the Moon is illuminated by the Sun, you may think to go the SSO lucky imaging method and see how that goes. Well, you can! But you can also take still images, and sometimes you might just want to do only that.
Many folks will wish to use a planetary camera for imaging these targets as well. This is great, but because of the small sensor, it may involve some mosaicing. More on that in a few.
You will also be surprised here just how small both these targets are with something like a 70-200mm lens. But, that does not mean you should not try to shoot them and they are certainly a LOT bigger than Planets!
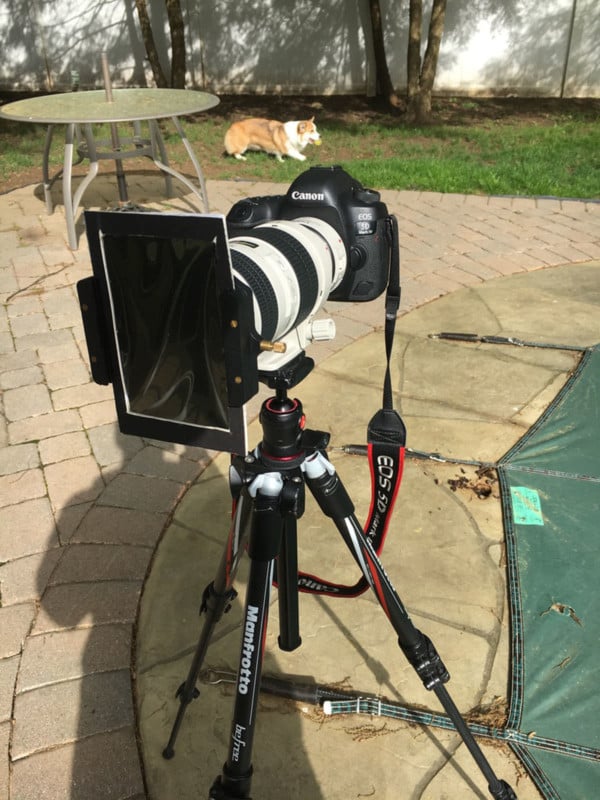
Warning: Before we proceed with anything here: Do not look at, or point any camera/lens at the Sun directly without any filter. You will cause permanent damage to yourself and your equipment. This guide will walk you through solar imaging in-depth and what types of solar filters you can use for safe imaging and even viewing. So, let’s get to it.
Planning for Solar/Lunar Photos
Use the exact same methods as described under SSO to plan out your shots, except this time you will need to pay attention to the moon phase. Maybe you want to shoot a waning crescent, or perhaps use Planit Pro or Photopills to incorporate a Moonrise or Moonset with a foreground element.
Shooting the Moon With Just a Tripod and Lens
Just like SSO, this can be done easily with a basic setup. But, you can also use the regular photo mode on your camera to shoot as well. In many cases, this may be more ideal as using your sensor’s full resolution may be advantageous.
- Place your camera on your tripod.
- Point your camera at the Moon. I think this one should be pretty easy to find.
- Start with a reasonably fast shutter speed, say 1/250 of a second. Pending the Moon phase, this may be too bright or too dark, but it is a good starting point as the Moon, like planets, moves very quickly and we want to freeze the motion.
- Start by adjusting your aperture to its widest.
- Compensate with the ISO to achieve a median exposure on the histogram.
- Shoot and see what you get. The Moon’s edges also show some chromatic aberration, so if you notice a significant amount then stop down to a narrower aperture. Then, use the ISO to compensate.
- Shoot as many shots as possible. Stacking is ideal here too as it can be used to bring out more detail and even some color in the Moon’s minerals.
Shooting with a Star Tracker
Just like SSO, some star trackers also have a Lunar mode, pending the make. You will want to use this.
Follow the same steps as above, but this time:
- You can most likely drop your ISO down pretty low.
- Your shutter speeds may vary between 10 seconds to 1 minute pending your focal length, and polar alignment accuracy.
- Because of the tracker advantage, use the most ideal aperture for your lens. Many have a sweet spot around f/8 or f/11 to achieve maximum sharpness.
- Shoot as many frames as possible, remember, stacking!
Using a Fully-Automated Setup and Mosaicing
Much like SSO, you can use your capture software to shoot the Moon. Because of automation, you may wish to shoot at a similar focal length to planets, such as 2000mm. This is great for getting amazing detail of the craters but does require that you shoot as a mosaic to get the entire surface in the frame. Fortunately, automation takes care of this once you get around the curve of programming it.
Follow the same steps above in SSO to get going with this type of setup.
The Basics of Shooting the Sun
The Sun is much bigger, but also much brighter. Very, very, very much brighter. So to shoot it, you need filters.
White Light Solar Filters
A standard white light solar filter is usually constructed of Baader film, glass, or similar material. Note this is not an ND filter. They differ slightly and an ND filter should not be used to image the sun as many do not have the same UV/IR eliminating properties white light solar filters have. A white light filter will create an aesthetic that shows the Sun as the yellowish color that we used to draw in art class as kids in elementary school. These filters also eliminate UV and IR light to prevent heat from reaching the sensor.
Warning: Most of these filters are both camera and visual safe, but before looking through one of these at the Sun, make sure the manufacturer has explicitly stated so.
Glass filters tend to be more on the expensive side, while Baader film filters are cheaper but not as clear.
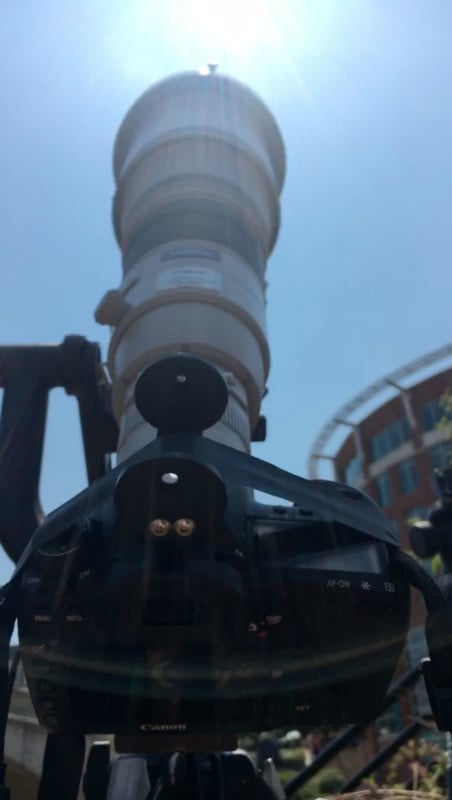
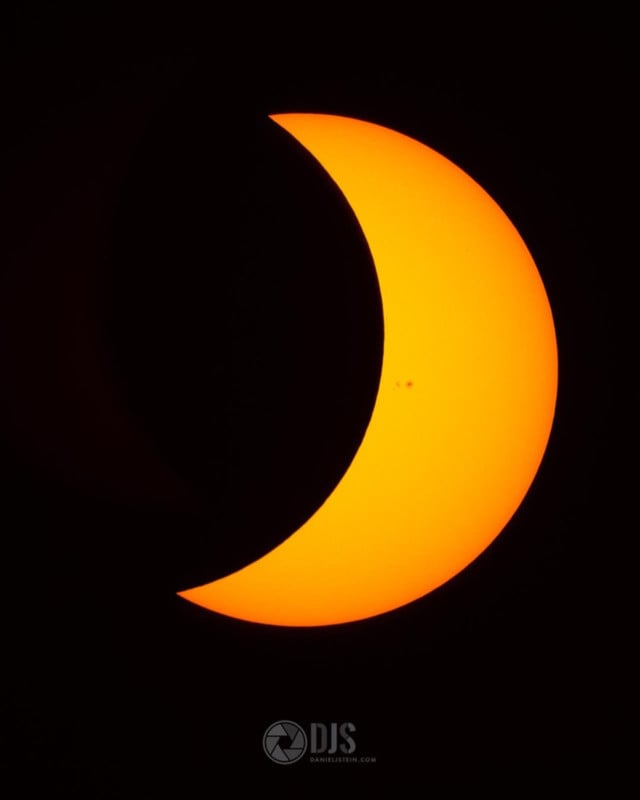
H-Alpha Filters
Stepping up in price and sophistication is the H-alpha solar filter. These can be added to some existing imaging scopes or can also be sold as standalone solar telescopes. These filters limit the light entering the imaging setup to the h-alpha wavelength, similarly to an H-alpha narrowband filter. But no, you cannot use a deep space narrowband filter to image the sun as even that bandpass is too large.
These filters are powered by some sort of external source, either a wall outlet or portable power bank, and some are made to adapt to Canon and Nikon camera bodies. But, if you do go the route of modifying an existing imaging setup to shoot H-alpha solar, you do need to add a UV/IR cut filter to the front element of your setup. This is because the h-alpha filter is placed in front of the sensor in between the telescope and therefore the front of your lens/scope is still pointing at the hot sun. A UV/IR cut filter will eliminate this heat and therefore make it safe.
These filters can also be configured to allow for more detail in solar prominences (solar flares) or the chromosphere of the sun. The downside to these filters is they will make the sun very dark due to the extremely narrow bandpass. You may be cranking the ISO a little higher than expected or using a tracker to compensate.
Shooting the Sun With a Camera and Tripod
Much like shooting the Moon, the steps for this will be pretty much exactly the same. The differences of course being well, it will be daytime!
- Place your camera on a tripod with the filter on.
- Point the camera at the sun. DO NOT look through the viewfinder if using a typical DSLR and the filter is not naked eye safe. I recommend using live view either way.
- Much like SSO/lunar, you will need to keep re-centering the target.
- Start with your base ISO, and an aperture at f/8 or f/11 for maximum sharpness. Adjust your shutter speed to 1/250 and you may need to go faster if need be.
- If it is too dark, try to keep the shutter speed at 1/250. Increase the ISO a few stops to compensate.
- Shoot as many frames as you can, stacking!
- Consider video mode as Lucky Imaging with video mode at a high FPS as well.
Shooting the Sun with a Star Tracker
Just like Lunar, star trackers also have a Solar mode, pending the make. You will want to use this. But, polar aligning a tracker in the day without any visible stars through the polar scope is difficult. The best you can do is use an app like PS Align Pro and try out the daytime polar alignment feature. It may not be perfect, but it is a little more precise than just using your phone compass and gets you to a good enough point.
Follow the same steps as above, but this time:
- Start with the base ISO and work your way up from there. If you are using an h-alpha filter remember your images may be very dark so it is possible you may need a little push here.
- Your shutter speeds may vary between 10 seconds to 1 minute pending your focal length, polar alignment accuracy, and filter used.
- Use the most ideal aperture for your lens. Many have a sweet spot around f/8 or f/11.
- Shoot as many frames as possible or shoot by lucky imaging.
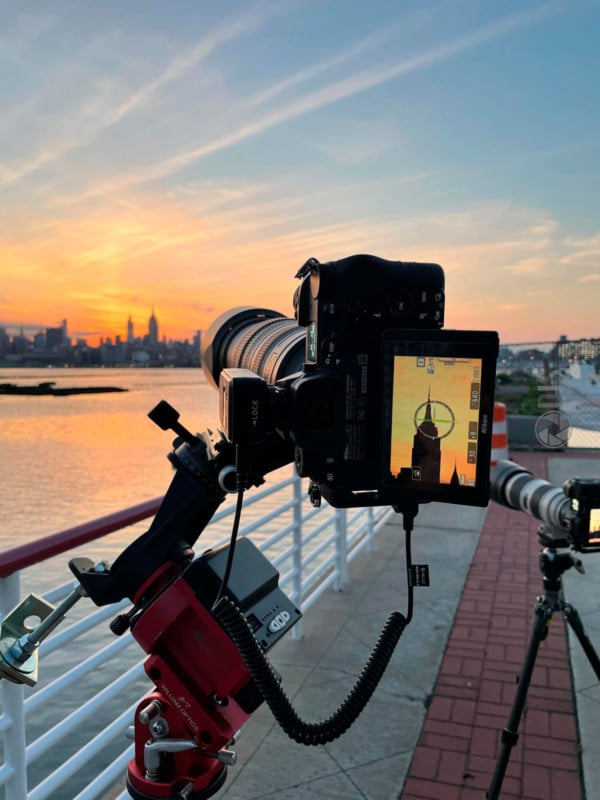
Shooting a Solar Eclipse
Who doesn’t love an eclipse? These are my favorite. Weather Solar or Lunar, use Planit Pro, Photopills, or Timeanddate.com to figure out when the next one will be in your region.
There are so many ways to shoot an eclipse. You can go the Moon mosaic route during a lunar totality or shoot wide to get context or landscape. The same goes with solar! During a 100% solar eclipse (not a 99, it needs to be 100), you can actually shoot the Sun with no filter and expose for the solar corona!
Plan your shots, and have fun with this.
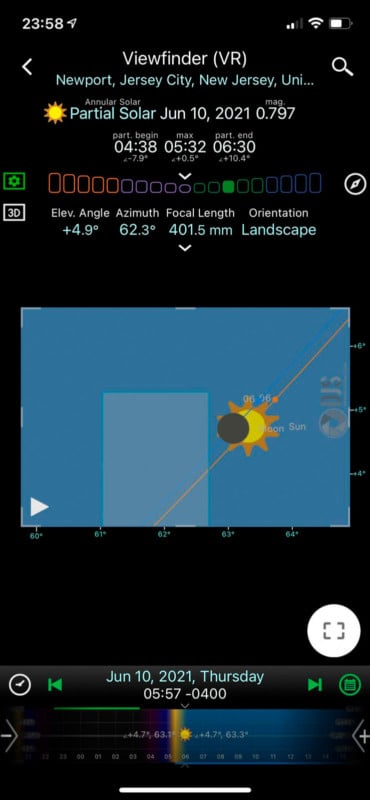
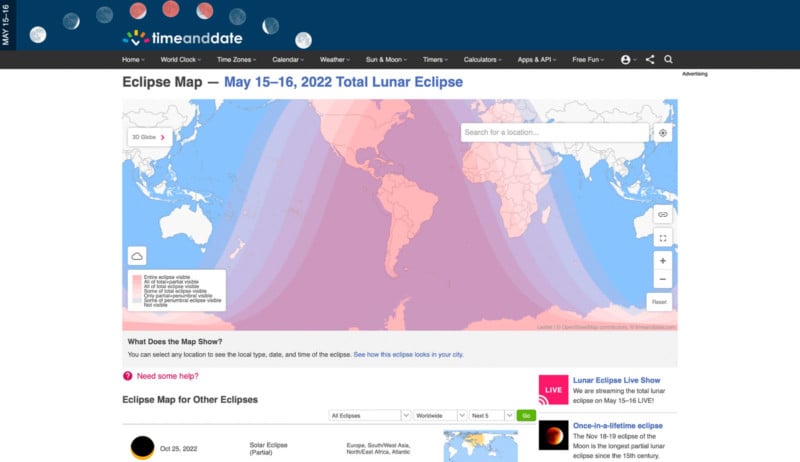
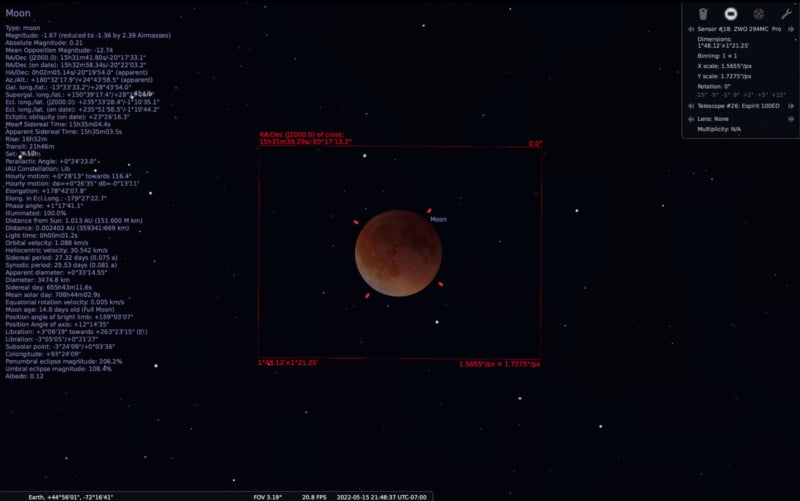
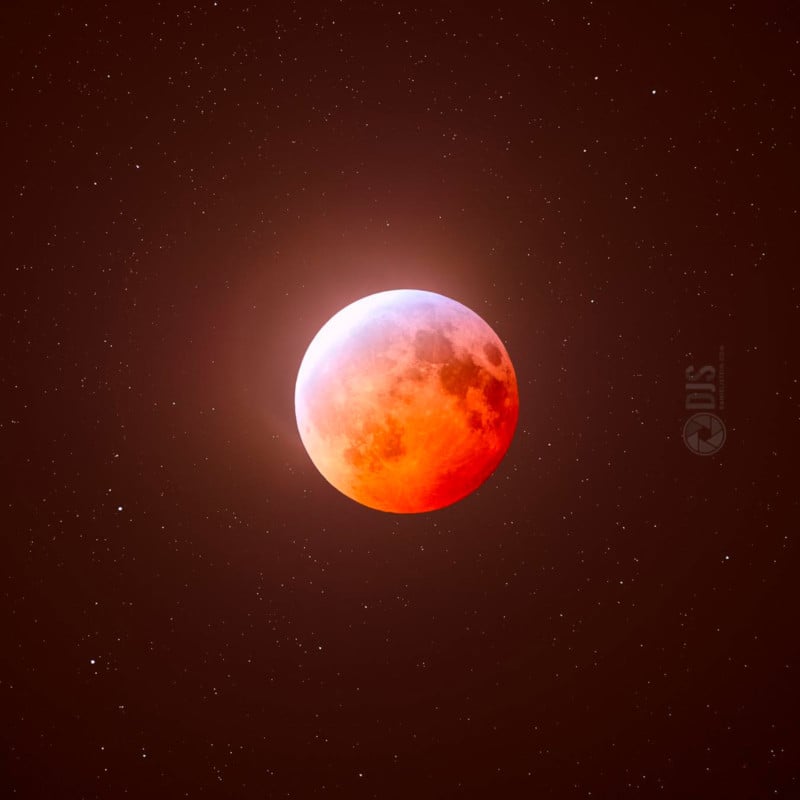
I feel like at this point you have the knowledge to piece together the necessary info to shoot everything astrophotography-related! This means figuring out where star trails will be and how long your shutter speed needs to be to shoot them for, or seeing if a new comet is going to be in the sky. Use your tools!
Processing Astrophotography Images
Wow okay. We have reached pretty much the end of this guide, but really now the fun is just getting started. Good processing can make or break an image, and while I cannot tell you how to process your images as they are all up to your artistic license, I do want to go over a few basics to get you on a good path to understanding it.
Basic Techniques and Tools
I know you are shooting RAW, so with that out of the way, let’s talk about simple sliders, curves, and adjustments that every RAW processor has. While I am sure many of you are familiar with these tools from standard photography, I want to put an astro twist on each.
- Exposure curve/histogram stretching. Important for the brightening or darkening of the image. But with astro, this comes with noise. Increasing the exposure also means increasing noise due to lack of signal, so without stacking you really want to be careful with this.
- Color Balance. While this differs from each category of astro, starting off with a natural color balance in your processing is a great way to get your feet on the ground. I actually am repeatedly going back to color balancing throughout my processing phases.
- Saturation/Vibrance. Great for enhancing the color of your shot, but it will not make up for a lack of signal. Adding too much will distort your image if no data is there to back it up.
- Noise reduction. Easy to overdo, but very necessary. Remember, stacking is the best way to reduce noise as you are literally averaging more data, but even with hours of stacks you may still have a noisy image. To do noise reduction properly, use masks as needed and be mindful of sharpness. You do not want to reduce noise to the point where you lose sharpness.
- Sharpness. Much like noise reduction, easy to overdo but very necessary. RAW data in itself needs to be sharpened. Use masks and watch for signs, especially on the edges of objects if you are applying too much.
- Background extraction. This is mostly used for deep space, this is important for removing any weird gradients in your images. This is not a replacement for shooting flat frames however, you still need those in certain categories.
Processing is a whole other dimension of astrophotography and it varies from software, genre, and operating system. It is hard to dive into each subgenre, so I think it is best if I give you a few examples of how to process each type.
The single shot nightscape: What I would probably do is keep it simple here. I think I would just use Lightroom to get my processing done.
The stacked nightscape: Now I would introduce software light StarryLandscapeStacker or Sequator. First, I would use LR for a bit of pre-processing. Then, I would stack. Then I would bring either back into LR to finish it up or Photoshop for deeper processing.
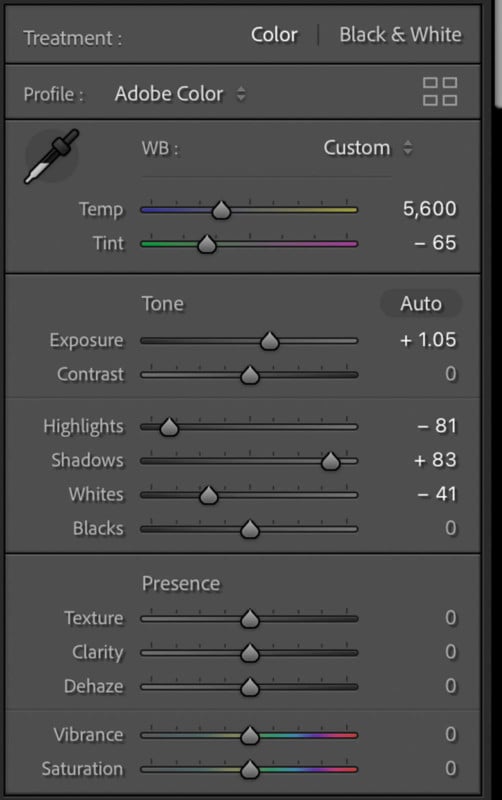
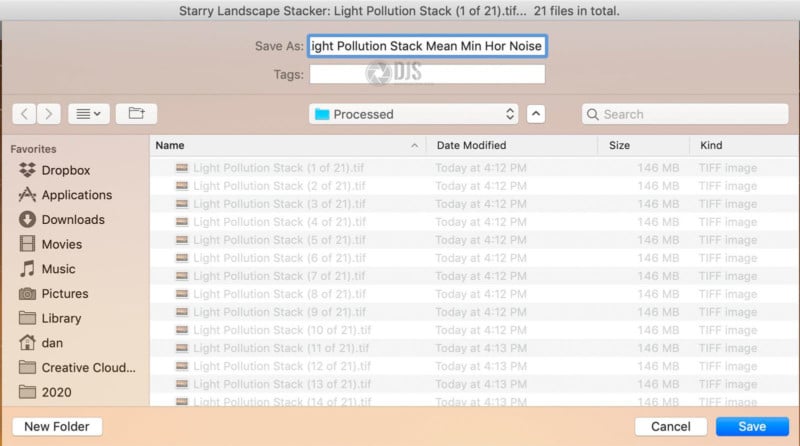
The tracked nightscape: First, Lightroom. some minor edits. Then, I would export both my foreground scene and my star scene into Photoshop. From there, I would create a layer mask on the foreground to allow for only the untracked foreground and tracked sky to be visible in their respective layers. Then, I would complete my edits.
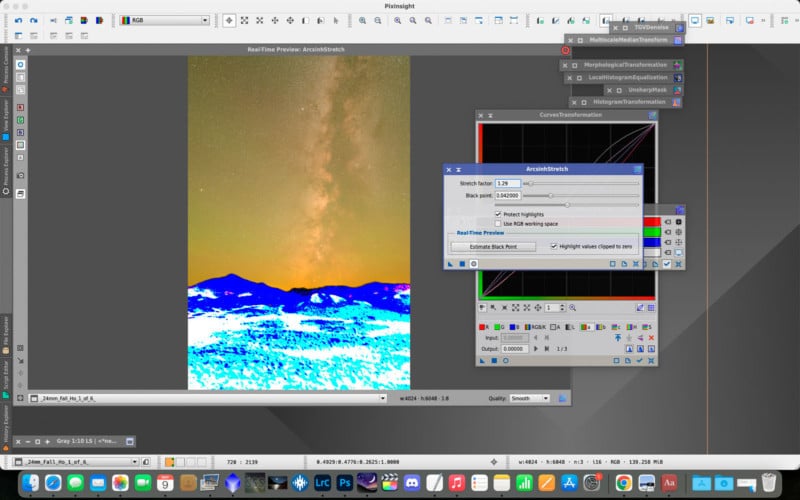
The tracked and stacked nightscape: This is pretty much a combo of the above. I would first LR everything and send it into stacking software. For this though, I may use StarrySkyStacker instead of StarryLandscapeStacker to do my stacking. I would also bring the star layer into Pixisnight for some astro-specific processing. Finally, I would bring everything into PS and create my masks and edits.
The tracked pano: My specialty! I love shooting these. First I would go from LR into software like PTGui for stitching. I would repeat the process for my foreground untracked pano as well. Then, into Pixinsight. Then, Photoshop.
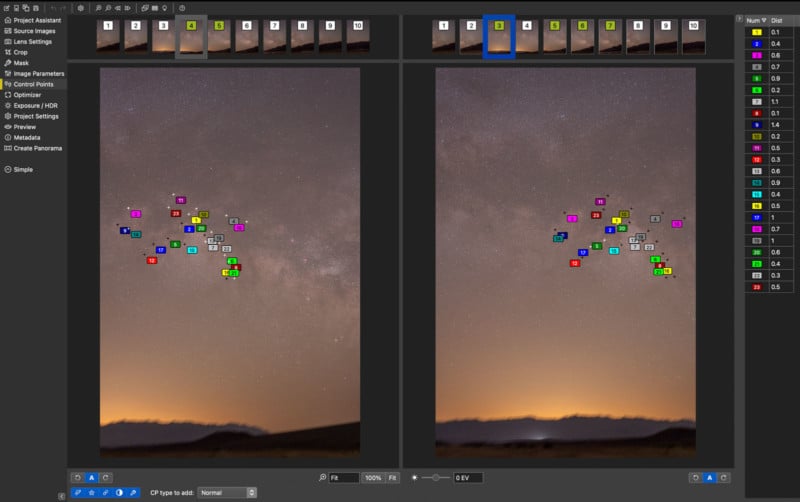
The tracked and stacked pano: The mac daddy! Basically a combo of the above.
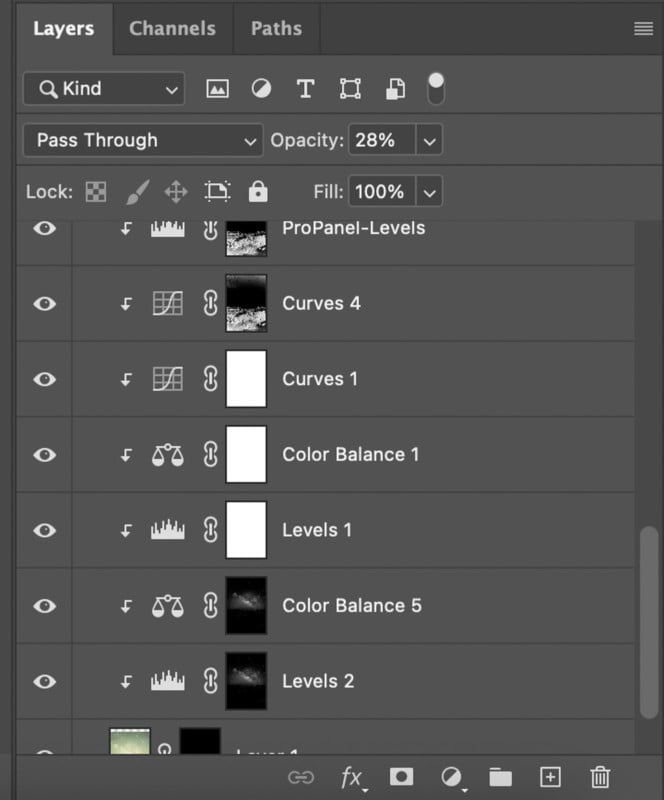
Deep Space
My workflow for DSO is heavily in Pixinsight, but you can also do much of the same in Photoshop or Siril or whatever. First, I will bring all of my lights, flats, darks, and bias into the Weighted Batch Pre-Processing script. I will then let that work its magic. After which, I would drizzle my image if I am undersampled (in other words when the pixels of your sensor are too large for your given focal length). Then, into processing I go. My workflow is pretty much as follows:
- Background extraction
- Color calibration
- Noise reduction
- Curve stretching
- Star reduction
- Sharpening
- Contrast enhancements
- Curve adjustments
- Maybe a hair more noise reduction
Many of these are used with masks and I also separate out a luminance layer for specific processing respectively for better detail without destroying my color data.
SSO: First video into Siril, then onto processing, pretty simple for me at least!
Solar/Lunar: Kind of a hybrid of the above. It will really depend on if you are shooting photos or video.
Conclusion
Well, there it is. The ultimate guide of astrophotography. Do not think this is the end though. There will be addendums to this article as time goes by, as I learn new techniques, and as the community around me offers some advice and other insight as well.
I hope this was as helpful as can be to you as you get started in astrophotography!
P.S. If this was not enough, I am offering one-on-one private astrophotography lessons as well either via FaceTime, Zoom, or in person depending on the region.
About the author: Daniel J. Stein is a passionate nightscape photographer working full-time in New Jersey in his family’s commercial plumbing contracting business. The opinions expressed in this article are solely those of the author. You can find more of Stein’s work on his website and Instagram.
Image credits: Header photo from Depositphotos. All other photos by Daniel Stein.