The Sunny 16 Rule in Photography
The Sunny 16 Rule is one of the simplest rules in photography that helps you gain correct exposure. It’s a formula that will tell you what shutter speed to use on a bright sunny day when the lens’s aperture is set to f/16.
Read on to learn how to use the Sunny 16 Rule as well as apply it to non-sunny days as well.
Table of Contents
Using the Basic Sunny 16 Rule on a Sunny Day
For example, if you were out taking landscape photos on a sunny day, here’s how you would know what shutter speed to select without relying on the automatic metering system on your camera.
Simply remember that when shooting at f/16 on a sunny day, the shutter speed should be “equal” to the ISO.
“Equal” in this case means the reciprocal of (i.e. one divided by that number). So, if you’re shooting at ISO 100, then your shutter speed would only need to be at 1/100 second for the correct exposure. If you’re shooting at ISO 800, then you shutter speed should be set to 1/800s.
Understanding Shutter Speed and Its Connection To ISO
If you are new to photography, then there are some fundamental settings that you should know more about. The first setting is Shutter Speed.
Shutter speed is the duration of time you allow light to fall on the camera’s sensor. It’s measured in seconds, and a single step doubles or halves the amount of light coming into the camera. In a low light scenario, the camera’s shutter needs to be open longer to gather as much light as possible to create an exposure.
In the Simple Sunny 16 Rule example, as there is plenty of light due to a sunning day, the shutter doesn’t need to be open for a long time.
So why do you need only to choose an ISO of 100 in this scenario?
To answer this, first, you need to know what ISO does. ISO is the sensitivity of the camera’s sensor (or film). The higher the ISO value, the less light is needed to create an equivalent exposure. On your camera, this setting is measured in increments or steps that double or halve in value at each step. You’ll see this when manually changing the setting. ISO starts at 100 on most cameras and changes in individual steps to 200, 400, 800, 1600, 3200, 6400, 12800, and 25600.
As there is plenty of light in our example, the camera doesn’t need to make the sensor as sensitive to light. ISO 100 will be enough to create a perfect exposure. If you choose a higher ISO like ISO 200, the resulting picture will become overexposed — assuming all other settings remain the same — as the camera’s sensor is twice as sensitive to light compared to ISO 100.
Understanding the Importance of the Exposure Triangle
Now that we understand how ISO and Shutter Speed interact with each other, the aperture is the final element left to discuss. Aperture forms another side of what people call the Exposure Triangle with the two other settings. When you adjust one setting, let’s say the aperture, then you need to make the same level of step adjustments to one or both of the other two settings (shutter speed and ISO). By doing so, you won’t gain an underexposed or overexposed image but a correctly exposed image.
So, why would you change your aperture? Why not shoot at f/16 all the time?
One reason to change your aperture is to control the amount of subject in focus within the frame. Think of this as creative control.

When you change the aperture, you control the depth of field in a photo. For instance, if you were to increase the opening aperture in the lens to f/4 instead of f/16, the background would appear more out of focus (have more bokeh).
If you took the same photo at f/16, then both the background and foreground would be in focus. So, having a maximum aperture of f/4 provides a more professional-looking photo in this example. You will gain beautiful bokeh in the background, allowing the foreground subject to shine without a distracting background.
The other main reason for opening the hole (aperture) in the lens to a larger size is to let more light through the lens. By doing so, you can reduce the ISO and decrease the time the shutter speed is required to gain a correct exposure. This is very useful if the sun isn’t out. The Sunny 16 Rule won’t apply if you come across this scenario. So what can you do?
Using the Sunny 16 Rule on Non-Sunny Days
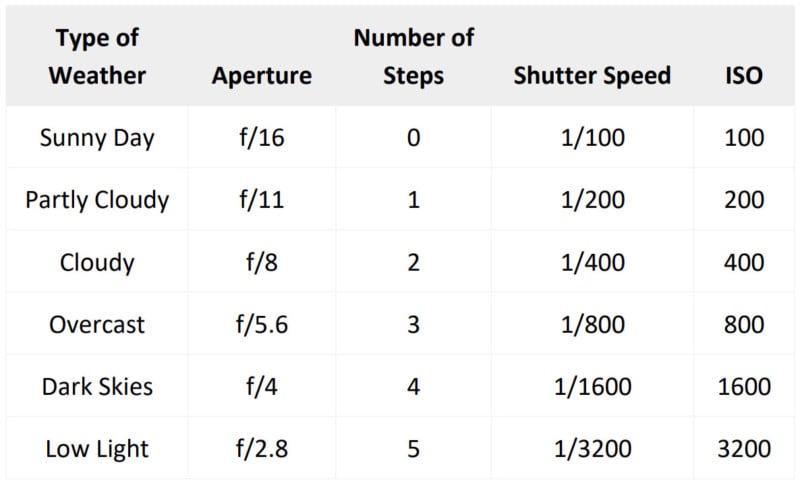
Not all days are sunny, and not all photos will be taken at f/16. This creates a problem for the rule. To overcome the challenge, you need to think about the different apertures and how many steps they are from f/16. Once you have worked out the number of steps, then apply the same number of steps in the opposite direction to both the Shutter Speed and ISO.

This can take time to master as you will need to remember the ‘strange’ numbers associated with Aperture, Shutter Speed, and ISO. Practice is where you can hone your knowledge.
Below is a guide of the different apertures you may encounter, plus how many stops of difference they are from f/16. Then to the right, you can match up the corresponding ISO, and Shutter Speed needed to gain correct exposure.
No Situation Is Going To Be Perfect
Fortunately, unlike photographers before digital photography, you don’t have to carry around a light meter to figure out the appropriate settings. Digital cameras have in-built light meters to do all the metering for you. However, if you rely on the Sunny 16 Rule in the real world, you may face a mixture of lighting scenarios. You should therefore take the above settings as a guide.
In most cases, these settings will work; however, you may need to extend the latitude of steps (or what people refer to as stops) to gain correct exposure. Practice makes perfect, and remember you don’t need to go out just on the bright sunny days to create photographs. Some of the best photos are taken in rain, hail, and shine!
About the author: Leigh Diprose is a business owner and full-time writer in the imaging industry whose passion is to share knowledge. His published work has been featured by top imaging wholesalers and leading imaging retailers in over 14 countries.
Image credits: Stock photos from Depositphotos